Configure 802.1x Authentication on Surface Hub
In order to connect a Surface Hub to an 802.1x authenticated network, you must configure the device with your organization’s settings. 802.1x networks typically require a network profile and necessary certificates to be installed on the device. In this article we’ll go over how to do this for a Surface Hub.
Export network profile
- Sign into a Windows device that has your existing 802.1x profile configured, and is connected to the network you want the Surface Hub to use.
- Open a command prompt with administrative credentials.
- Run one of the below commands to export the wireless or wired network profiles to the C:\ directory. Detailed instructions can be found on the Export Wi-Fi settings from a Windows device page.
Export wireless network profiles
netsh wlan export profile folder=C:\

Export wired network profiles
netsh lan export profile folder=C:\
Add network profile and certificates to Surface Hub
Once the XML network profile is exported, we can deploy it to the Surface Hub using Intune or a provisioning package.
Intune
Follow the guidance on these pages to configure Intune to import wireless and wired network profiles and create SCEP certificates.
Provisioning Package
Provisioning packages allow you to deploy settings to the Surface Hub using a .ppkg file that is installed locally using a USB drive.
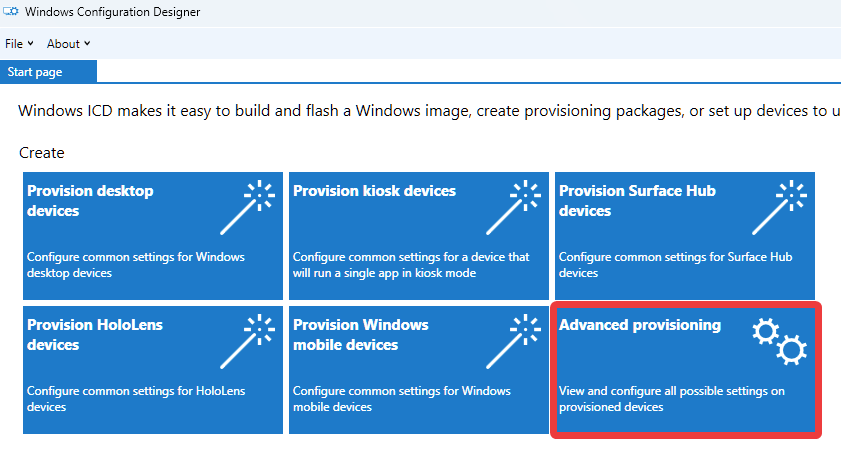
Install and open the Windows Configuration Designer on a Windows 10/11 PC. Select Advanced provisioning and create a new project for “All Windows editions”.
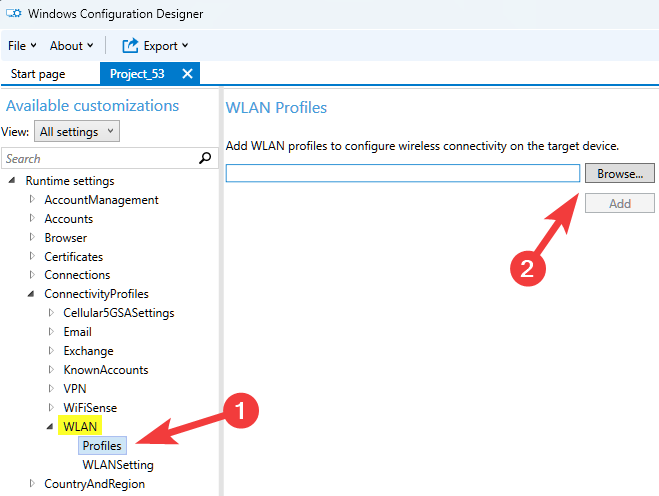
Add Wireless Network Profile
Navigate to Runtime settings > ConnectivityProfiles > WLAN > Profiles. Click browse and navigate to the wireless network XML profile you want to install on the Surface Hub.
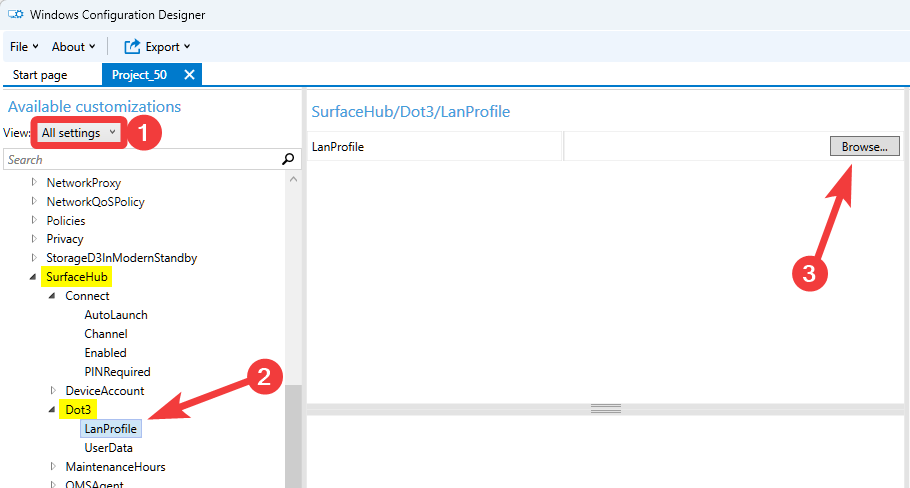
Add Wired Network Profile
Navigate to Runtime settings > SurfaceHub > Dot3 > LanProfile. Click browse and navigate to the wired network XML profile you want to install on the Surface Hub.
Add Certificates
If your organization requires certificates for 802.1x authentication, these can be added to the package in the below locations. More information on installing certificates on the Surface Hub can be found here.
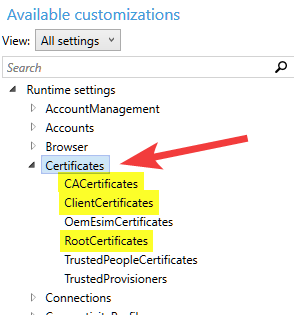
| Certificate Type | Provisioning Package Location | Device Store |
| Root Certificate | RootCertificates | Machine store |
| Intermediate Certificate | CACertificates | Machine store |
| Client Certificate | ClientCertificates | Personal store |
Build Provisioning Package
After adding the network profile and certificates to the package, click Export at the top and then Provisioning package. Follow the remaining prompts to build the package.
Install Provisioning Package on Surface Hub
Copy the .ppkg file to the root of a USB drive. Insert the drive into the Surface Hub and go to Settings > Surface Hub > Device Management > Add or remove a provisioning package. Select the package from the USB drive and install it.
Note: The Surface Hub doesn’t support enrolling the certificate to TPM. The certificate needs to be created to enroll to Software KSP.

Troubleshooting
If the Surface Hub is having issues connecting to the network after installing the network profile and necessary certificates, your networking team can analyze the Windows network event logs to further troubleshoot. These logs can be viewed on the Surface Hub natively by going to Settings > Update & Security > Logs > Event View > Open. Using the dropdown folders on the left, navigate here:
Wireless event logs
Event Viewer (Local) > Applications and Services Logs > Microsoft > Windows > WLAN-AutoConfig > Operational

Wired event logs
Event Viewer (Local) > Applications and Services Logs > Microsoft > Windows > Wired-AutoConfig > Operational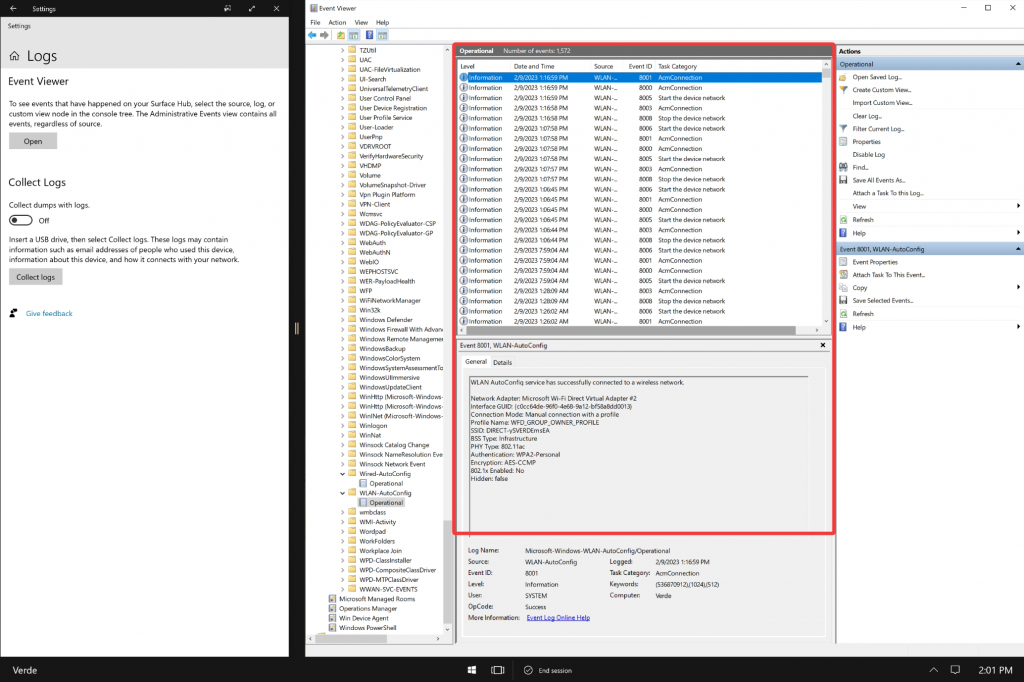
Collect Logs
The Windows networking event logs are also included in the .zip file the Surface Hub generates when collecting logs. If you’d like to analyze the logs on a separate PC, follow these instructions to collect the logs. Once the .zip file is obtained, unzip the files and navigate to the network event logs.
Wireless event logs
<Logs>\WindowsEventLog\Microsoft-Windows-Wired-AutoConfig%4Operational.evtx

Wired event logs
<Logs>\WindowsEventLog\Microsoft-Windows-WLAN-AutoConfig%4Operational.evtx
See Advanced troubleshooting 802.1X authentication for additional details on analyzing these logs.
