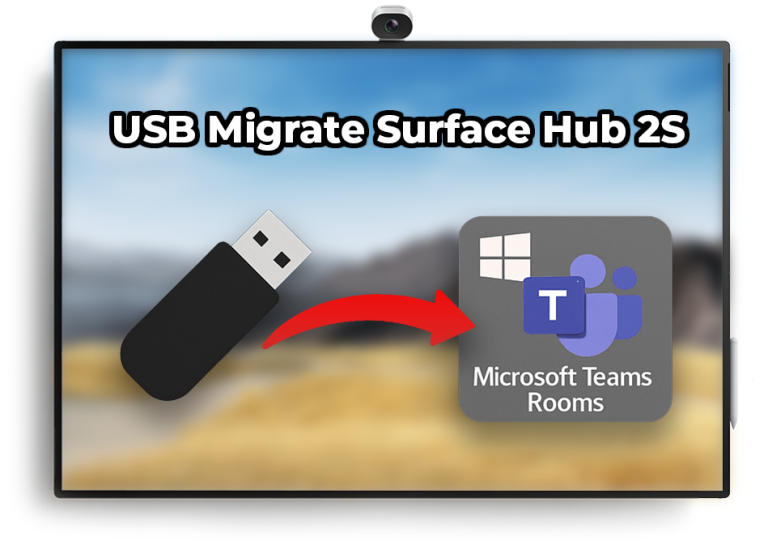
How to USB Migrate Surface Hub 2S to Microsoft Teams Rooms on Windows (MTR-W)
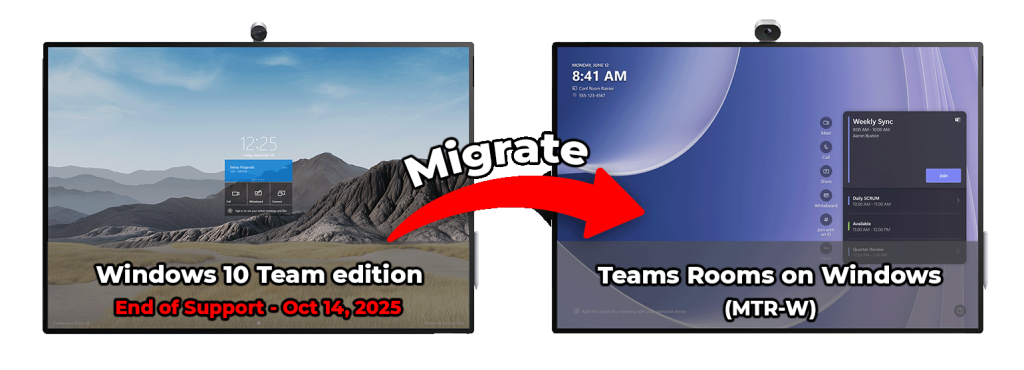
With Windows 10 Team edition reaching end of support on October 14, 2025, organizations need to transition Surface Hub 2S devices to Microsoft Teams Rooms on Windows (MTR-W). There are a few migration paths available, including a software-based method using a Microsoft Store app and a hardware upgrade via compute cartridge replacement. This guide focuses on USB-based migration, an offline method for installing MTR-W on a Surface Hub 2S using a USB drive.
Why Choose the USB Migration Method?
USB migration allows the entire process to be completed on-site in a single visit. It requires no internet connection, cloud services, UWP app installation, or background downloads, making it the fastest and most self-contained option. The USB-based method is also the fallback migration path if the software-based migration fails to complete or is unsupported in your environment.
This approach mirrors the established process for migrating a Surface Hub 2S to Windows 10 or 11 Pro or Enterprise. However, instead of applying a general-purpose OS image, we use the Microsoft Teams Rooms on Windows (MTR-W) recovery image.
What This Guide Covers
This guide is organized into five sections that cover the complete USB migration process for installing the Microsoft Teams Rooms on Windows (MTR-W) operating system on a Surface Hub 2S. You’ll learn how to unlock UEFI to enable MTR-W OS installation, create a bootable USB drive, confirm Surface Hub 2S meets minimum UEFI requirement and then complete the MTR-W OS installation. If you’re performing this migration for the first time, it’s recommended to begin with Section 1 and follow the steps in order.
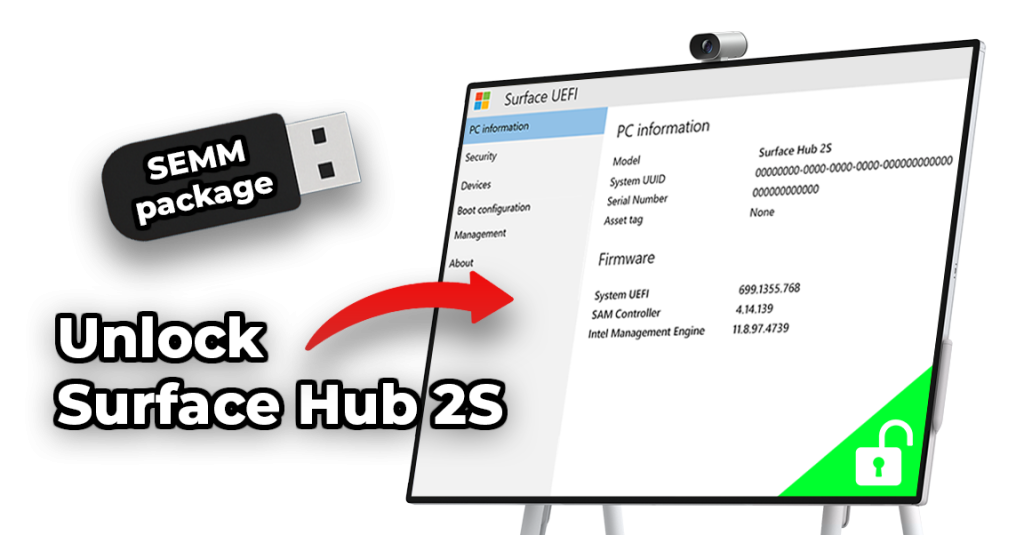
Section 1 – Unlock Surface Hub 2S for MTR-W Installation
Generate a Surface Enterprise Management Mode (SEMM) package that unlocks UEFI settings on the device. Unlocking UEFI is a required step before the device can be migrated.
Section 2 – Create Bootable USB drive with MTR-W Media
Prepare a USB flash drive that contains the MTR-W installation media. You can also copy the UEFI unlock package to the same drive, allowing a single USB device to be used for the full Surface Hub 2S OS migration.
Section 3 – Confirm Devices are Ready for MTR-W
Verify that each Surface Hub 2S meets the minimum firmware or OS build requirements needed for a successful MTR-W migration.
Section 4 – USB Migrate Surface Hub 2S to MTR-W
Unlock UEFI using the SEMM package, boot the Surface Hub from the USB drive, and install Microsoft Teams Rooms on Windows (MTR-W).
Section 5 – Post-Migration Setup and Automation
Automate the Windows 11 out-of-box experience on Surface Hub 2S using a USB provisioning package with custom enterprise settings. This method also supports automatic 802.1X network authentication, domain joining and configuring many other settings during initial setup.
Section 1: Unlock Surface Hub 2S for MTR-W 🔗
Before you can install Microsoft Teams Rooms on Windows (MTR-W) on a Surface Hub 2S, the device’s UEFI firmware must be unlocked. By default, Surface Hub 2S is restricted to only run Windows 10 Team edition, which prevents booting or installing any other operating system.
To remove this restriction, you’ll need to create and apply a Surface Enterprise Management Mode (SEMM) package that enables the EnableOSMigration policy in UEFI. Once applied, the device can boot from a USB drive and install the MTR-W operating system.
Note: You only need to create the SEMM package once. The same package can be reused across as many Surface Hub 2S devices as needed, simplifying multi-device deployments.
Create SEMM Package to Enable OS Migration
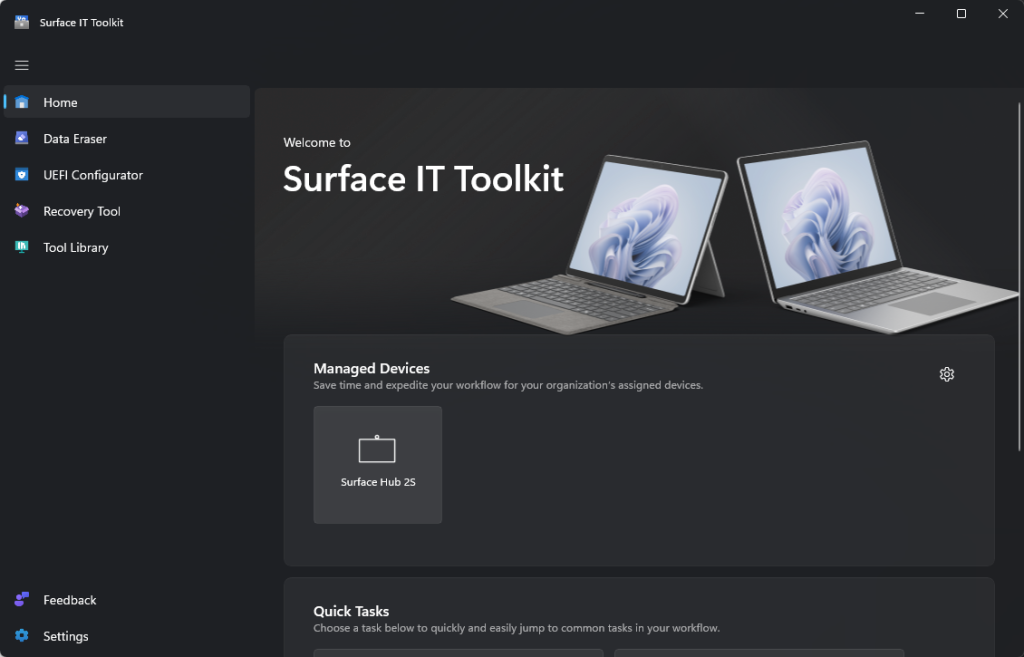
In the steps below, we will walk through how to create the SEMM package using the Surface IT Toolkit.
Download the Surface IT Toolkit and install it on a Windows PC. This includes the Surface UEFI Configurator needed to create your SEMM package.
Certificate needed for SEMM
Before you can create the SEMM package, you will need a digital certificate that meets the SEMM certificate requirements. This .pfx certificate acts as a secure key that proves the package was created by someone authorized to make changes to the device’s UEFI firmware settings. Without it, the Surface Hub 2S will not allow those changes to be applied.
If your organization already uses certificates, you may be able to use one that already exists. If not, you can either request one from a trusted third-party provider or create a self-signed certificate specifically for this purpose. In the steps that follow, we will explain each option and guide you through how to obtain a certificate or create a self-signed certificate that works with SEMM.
Choose the Right Certificate for SEMM
The best way to obtain a certificate for SEMM depends on how your organization is structured, what security policies are in place, and who is responsible for managing devices. While there are multiple valid approaches, the key requirement is to ensure the certificate is safely backed up. Without it, future access to UEFI settings will not be possible.
Important: Certificate expiration does not affect device functionality, but it does prevent you from managing, resetting, or recovering UEFI settings through SEMM.
A self-signed certificate is a digital certificate that is created and signed by the same entity, without involving a certificate authority. It can be used with SEMM to manage Surface Hub 2S devices and is useful for testing, pilot migrations, or environments without an established certificate infrastructure.
Note: Using a self-signed certificate on the Surface Hub 2S is technically fine, but not recommended for production use. If you do choose this route, make sure to save the certificate for future reference, just like all other scenarios.
To get started, follow the Self-signed certificate guide. You’ll need a Windows PC with admin rights. This YouTube walkthrough shows the same process visually. The steps below summarize how to copy the script, make basic edits, and create the self-signed certificate.
Create Self-Signed Certificate
- Sign in to a Windows PC with admin rights, go to the Self-signed certificate page, and copy the example PowerShell script.
- Paste the script into Notepad or another text editor.
- It’s recommended to change the default password (12345678) to something more secure.
- You can optionally modify the “-FilePath” attribute if you want to change the output location or filename.
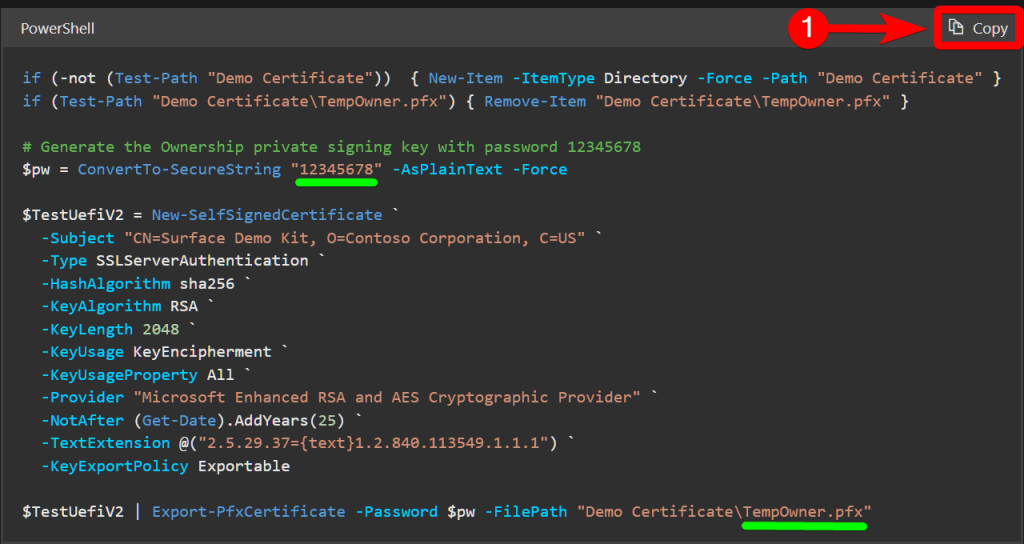
- Save the file while changing the extension to .ps1. For example: Create-Certificate.ps1
- Open PowerShell as Administrator and run the following command to allow script execution if not already enabled:
Set-ExecutionPolicy remotesigned - Run the .ps1 script by entering the full file path in the PowerShell window and pressing Enter.
- Locate the generated certificate at the default path:
C:\Windows\System32\Demo Certificate\TempOwner.pfx - Back up the .pfx file to a secure location. This will be used in Step 3 when creating the SEMM package.
Why Backing Up the SEMM Certificate Is Critical
The certificate used to enroll a Surface Hub 2S device into SEMM is required for any future changes to UEFI settings, including SEMM unenrollment. If the certificate is lost, you will be unable to make UEFI changes or unenroll from Surface Enterprise Management Mode (SEMM). This can only be resolved by replacing the Surface Hub 2S compute cartridge. To prevent permanent lockout of making future UEFI changes, always back up your SEMM certificate to a secure location. For more information, see the SEMM certificate requirements.
Now that the Surface IT Toolkit is installed and your .pfx certificate is ready, the next step is to create the SEMM package that will unlock UEFI on the Surface Hub 2S, allowing the device to install the MTR-W operating system. This is done using the Surface UEFI Configurator, which is included in the Surface IT Toolkit. Once the .dfi package is created and signed, we will copy it to the bootable USB drive.
Follow the below steps to create a SEMM package that will allow the Surface Hub 2S to boot from the MTR-W USB media. For complete instructions, including additional screenshots, refer to Microsoft’s official SEMM creation guide.
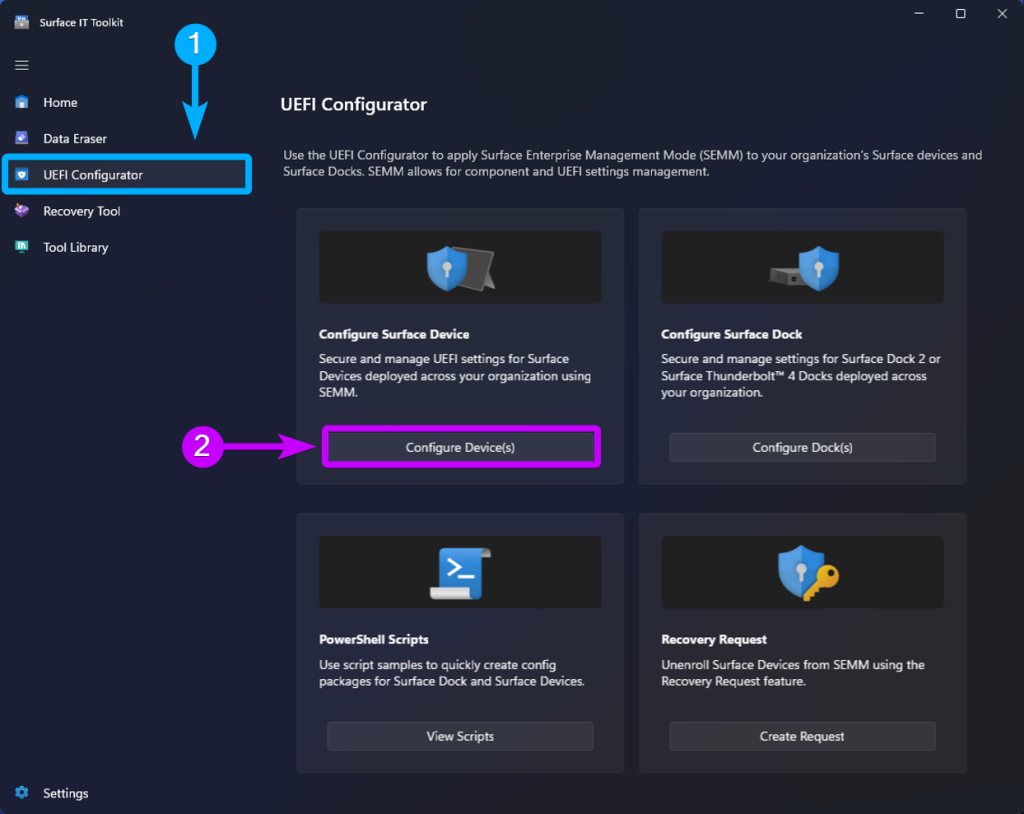
- Launch the Surface IT Toolkit
- Device Family and Model: select Surface Hub > Surface Hub 2S
- Select UEFI Configurator
- Under Configure Surface Device select Configure Device(s)
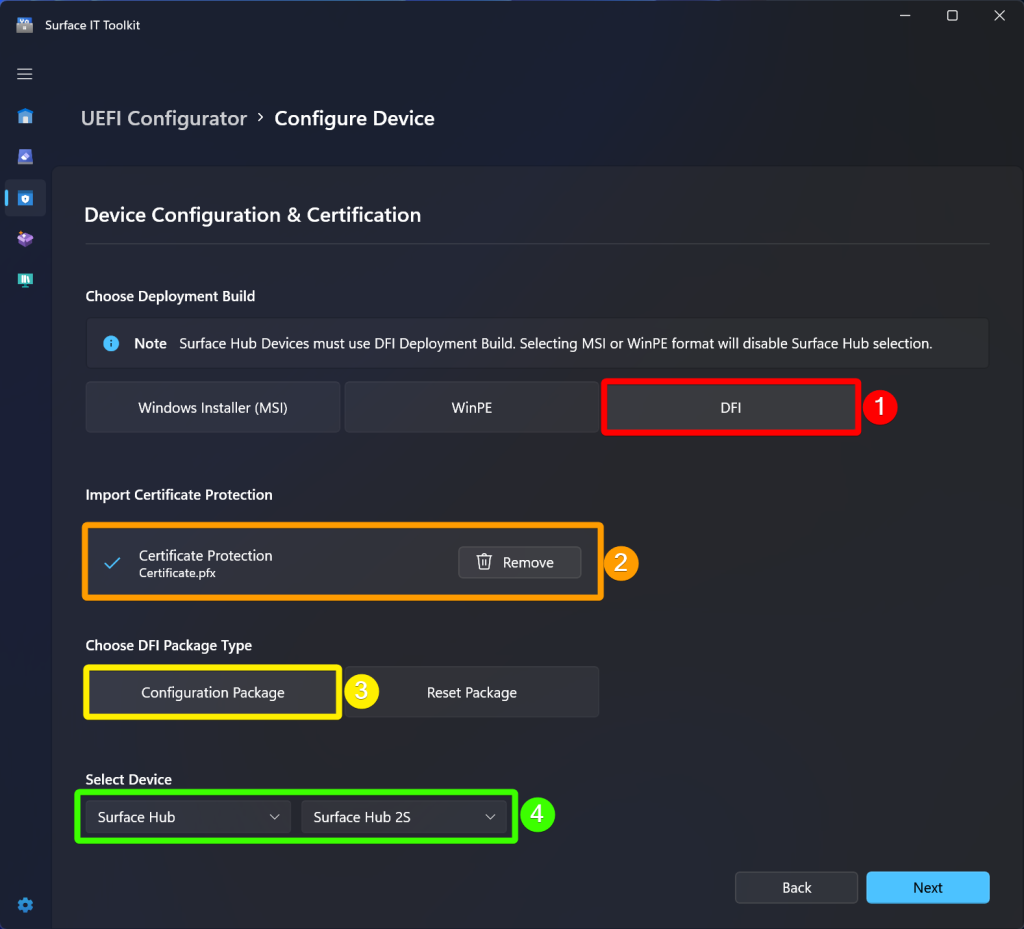
- Device Configuration & Certification settings:
- Deployment Build: Select DFI
- Certificate: Click Add, select your .pfx certificate file (requirements), and enter its password
- Package Type: Choose Configuration Package
- Device Selection: Check both Surface Hub and Surface Hub 2S and select Next
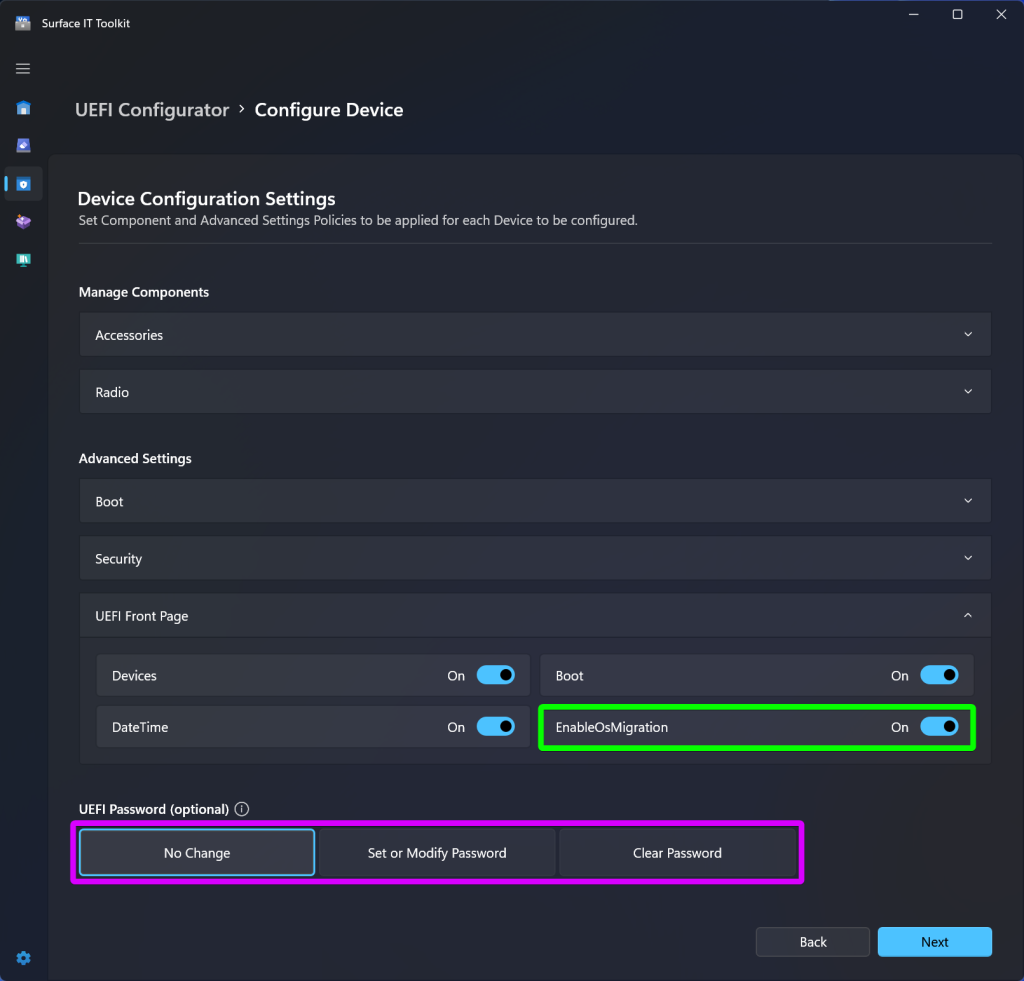
- Device Configuration Settings
- Advanced Settings > UEFI Front Page, toggle EnableOSMigration to On.
- This is required to unlock UEFI and allow the Surface Hub 2S to boot from external media and install a new operating system.
- UEFI Password: optionally set a password so its required when accessing UEFI settings on the device. Select Next.
- Advanced Settings > UEFI Front Page, toggle EnableOSMigration to On.
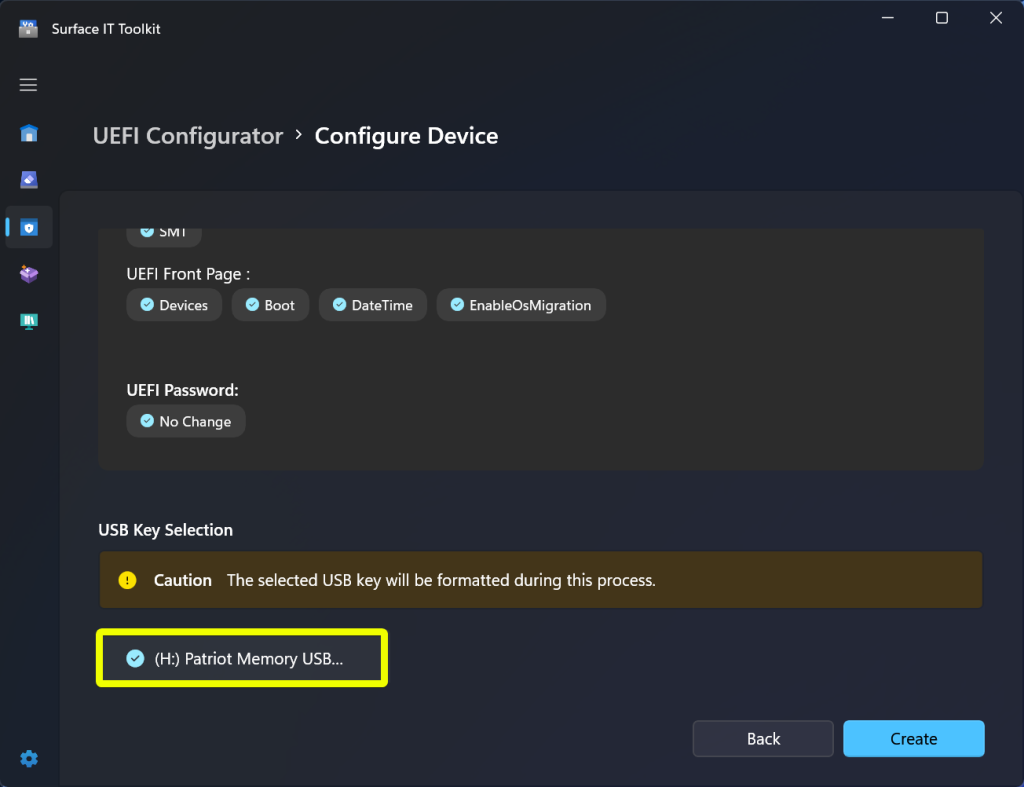
- USB Key Selection
- Insert the USB drive and confirm its selected.
- Select Create
Note: pressing create will format the USB drive and delete all previously stored data.
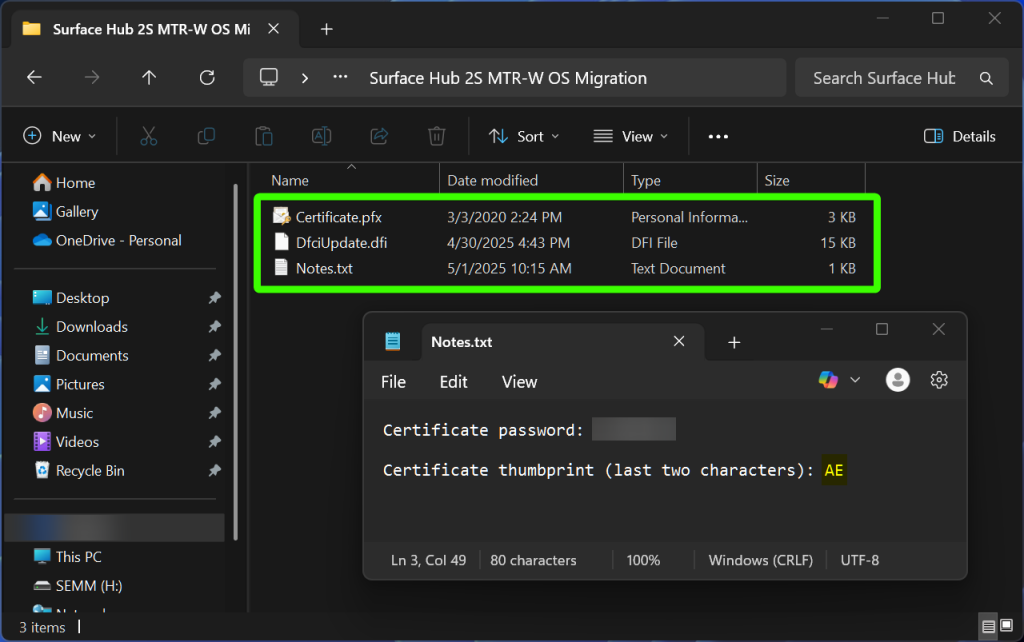
- Record the Certificate Thumbprint – Once the SEMM package is created, the Surface IT Pro Toolkit will display the last two characters of the certificate thumbprint. You will need these two characters later when applying the SEMM package on the Surface Hub 2S. Note them carefully, then click Finish.

If you didn’t save the certificate thumbprint when creating the SEMM package you can extract it directly from the .pfx certificate file using PowerShell. To extract the thumbprint:
- Open PowerShell as Administrator
- Run the following command, replacing the file path and password as needed
- For this example, the last two characters are AE.
$pfx = Get-PfxCertificate -FilePath "C:\Path\To\YourCert.pfx"
$pfx.Thumbprint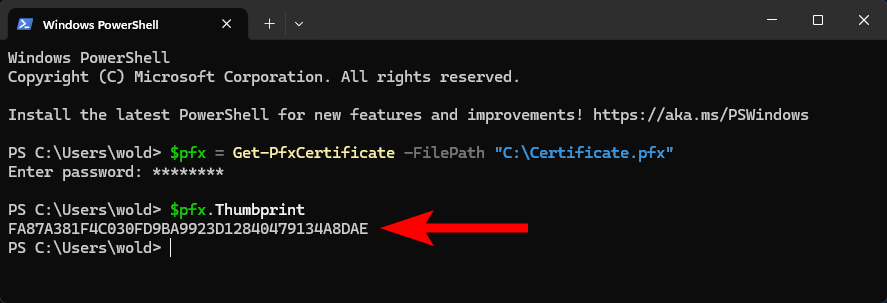
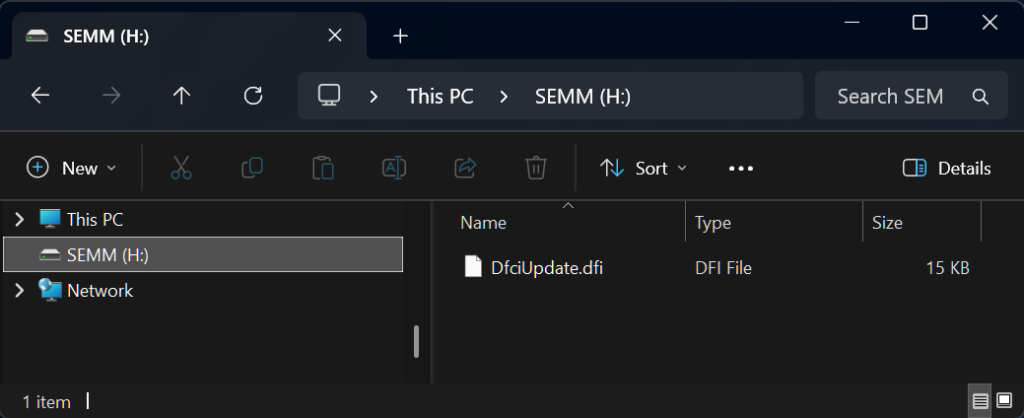
After the SEMM package creation process completes, open File Explorer and navigate to the root of the USB drive. You should see a file named DfciUpdate.dfi, which is the SEMM package. This confirms the Surface IT Toolkit successfully formatted the USB drive, created the .dfi SEMM package and moved it to the USB drive.
To keep things organized, you can optionally create a folder that contains all files related to the Surface Hub 2S USB-based OS migration, which include:
- Certificate.pfx – The certificate used to create the SEMM package. This file must be preserved. If the certificate is lost, you will not be able to make future changes to UEFI settings or unenroll the device from SEMM.
- DfciUpdate.dfi – The SEMM package used to unlock UEFI and enable installation of MTR-W on Surface Hub 2S.
- Notes.txt – A text file containing the last two characters of the certificate thumbprint (required during installation) and optionally the certificate password.
Security Reminder: follow your organization’s security policies. Do not store passwords in plain text unless explicitly permitted.
Pro Tip: store these files in a secure, backed-up, and centrally accessible location. Avoid keeping a single copy to ensure these files remain available if needed in the future.
Section 2: Create Bootable MTR-W USB drive 🔗
To migrate a Surface Hub 2S to Microsoft Teams Rooms on Windows (MTR-W) using the USB method, you’ll first need to create a bootable USB drive that contains both the MTR-W recovery image and the Surface Enterprise Management Mode (SEMM) package (covered in Section 1). To create this drive to USB-migrate a device you’ll need the following:
What You Need
How to Create a Bootable USB Drive
There are two supported methods for building the USB drive, depending on your tools and preferences.
The Surface IT Toolkit is the most efficient way to create a bootable USB drive for migrating a Surface Hub 2S to Microsoft Teams Rooms on Windows (MTR-W). It handles the entire process: downloading the MTR-W recovery image, formatting the USB drive to FAT32, making it bootable, and copying over the installation media.
For full instructions, refer to the official Microsoft guide: Get started with Surface IT Toolkit
- Download and install the Surface IT Toolkit, then complete initial setup.
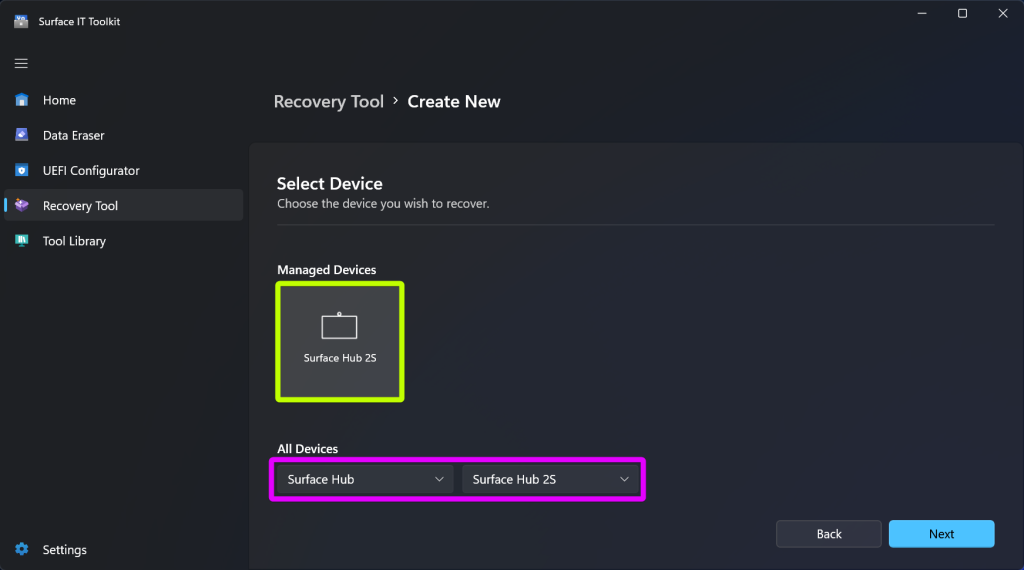
- Open the toolkit and select Recovery Tool, then click Create.
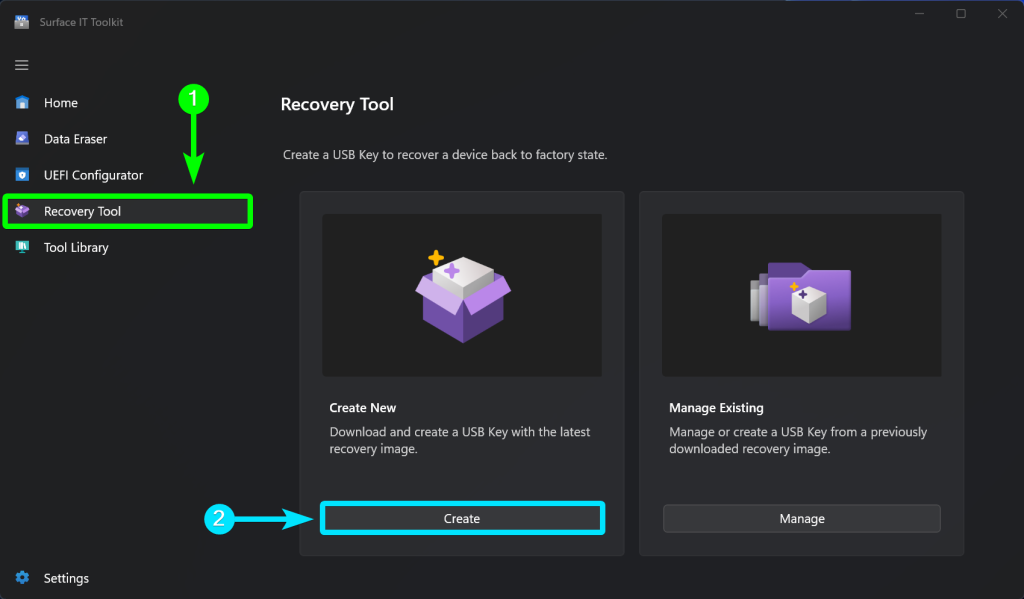
- Choose Surface Hub 2S and click Next.
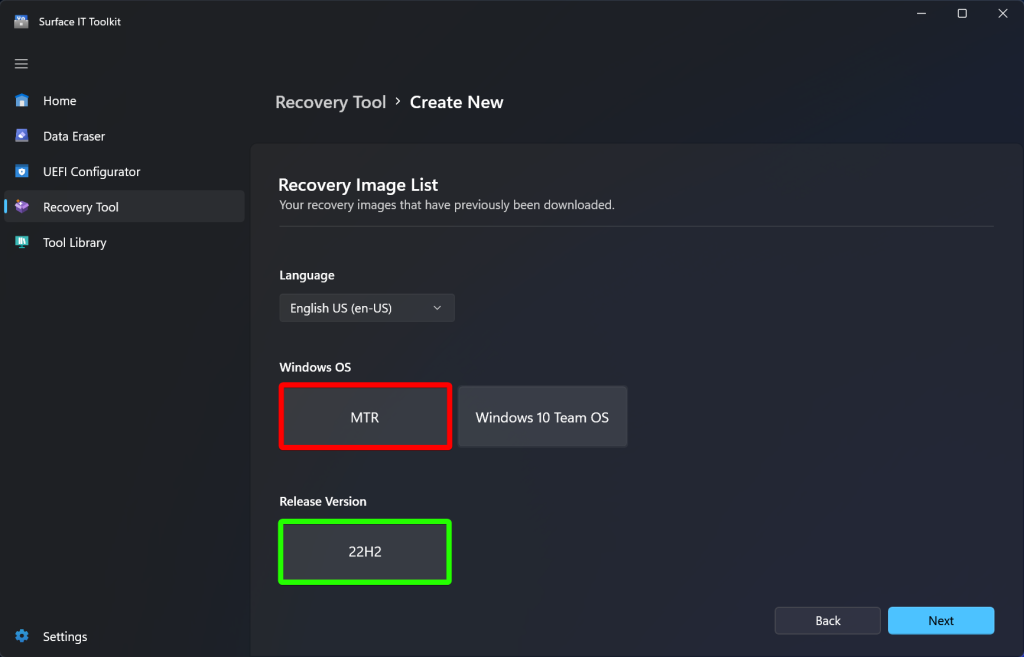
- Under Recovery Image List, select your preferred language, choose Windows OS: MTR, and select Release Version: 22H2 (or newer). Click Next.
- For Available Language Package, choose Rest of World or China, then click Next.
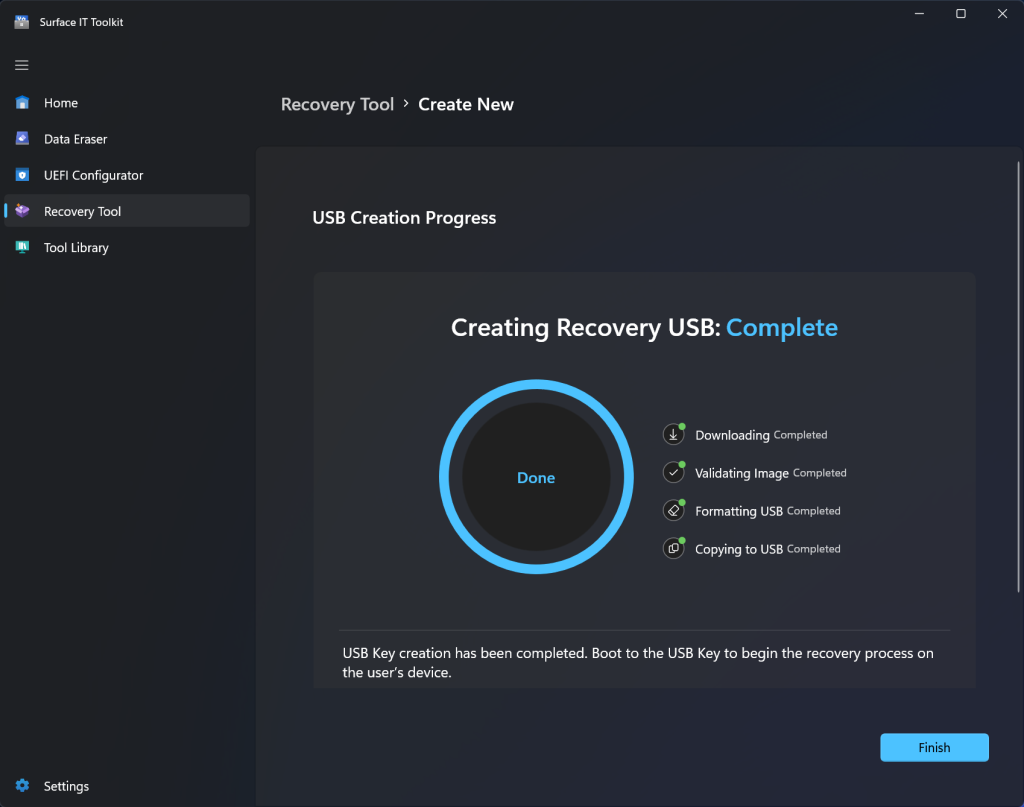
- Review all details, confirm the correct USB drive is selected, and click Create.
This process will format the USB drive and erase all existing data. If the USB drive contains the .dfi SEMM package we created in Section 1, copy the .dfi file to another location so it is not deleted. After the Surface IT Toolkit completes building the bootable USB drive, copy the .dfi package file back to the USB drive.
Having Issues with the Toolkit?
If the Surface IT Toolkit fails to launch, install, or complete the USB creation process, you can proceed with Method B as an alternative. This manual approach allows you to build the MTR-W recovery USB drive without relying on the toolkit.
To manually build the bootable MTR-W USB drive, you will first download the official recovery image, make the USB drive bootable, and then copy the Windows installation media onto it. This follows the same general process used to reset and recover a Surface Hub using the BMR (bare-metal recovery) method.
The key requirements are that the USB drive must be 32GB or larger and formatted in FAT32, and the recovery image files must be copied to the root of the drive. The steps below will walk you through how to complete this process.
To begin, download the Microsoft Teams Rooms on Windows (MTR-W) recovery image. You’ll need a Microsoft account (MSA) and a Surface Hub 2S or 3 serial number to access the download. The same recovery image can be used to migrate multiple Surface Hub 2S devices to MTR-W.
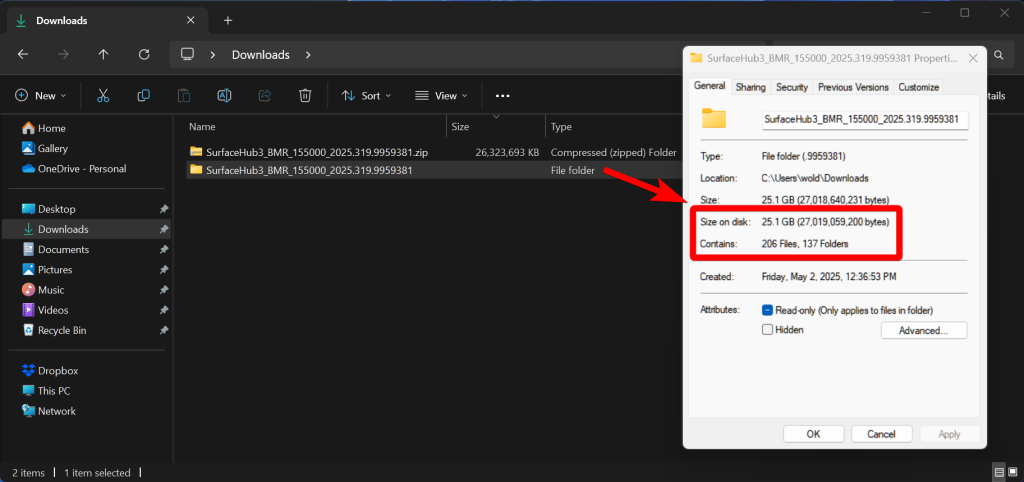
Note: The PC used for downloading and extracting the recovery image should have at least 52 GB of free space. This allows room for the ~26 GB .zip file and the extracted contents, which will later be copied to the USB drive.
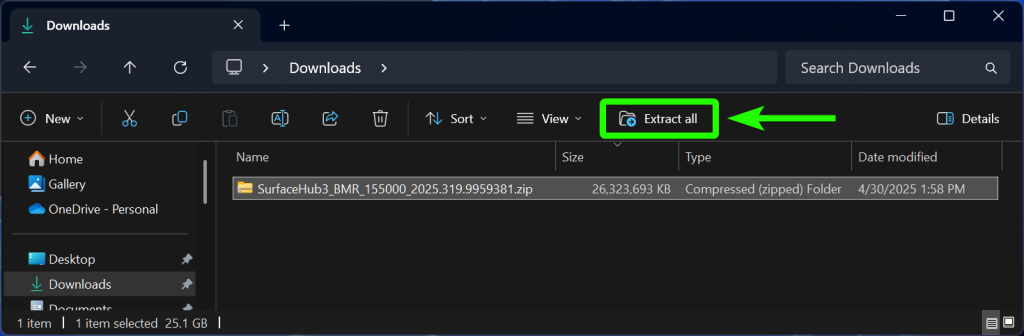
- Visit Surface Recovery Image.
- Select Surface Hub 2S or Surface Hub 3 as the device type and enter the device serial number.
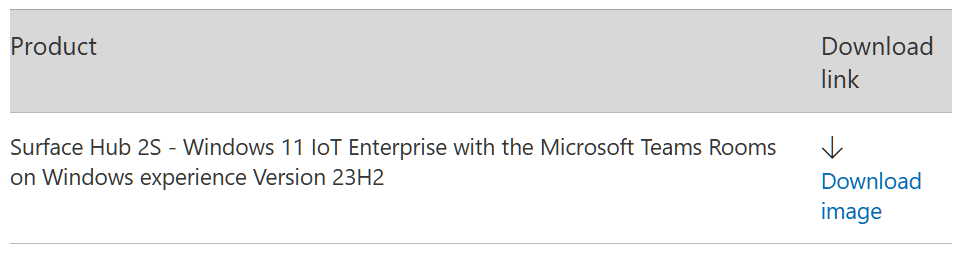
- Download the image titled: Surface Hub 2S – Windows 11 IoT Enterprise with the MTR-W experience Version 23H2
- Extract the contents of the downloaded ZIP file to your local computer.
- Once the recovery image has been extracted, the folder should appear as shown below.
To manually create a bootable USB drive, you can either use the Windows Recovery Drive tool, which will automatically format the drive, or you can manually format the drive using the command prompt.
Note: Both methods will reformat the USB drive and permanently erase all existing data.
This uses the built-in Windows GUI tool to format and make the USB drive bootable. This is the simplest option to create a bootable drive for most users. For further guidance, see Microsoft’s article on recovering a Surface Hub using a USB drive.
Steps to Create Bootable USB Drive
- On your Windows PC, open the Start menu and search for Recovery Drive.
- Launch the tool and uncheck the option “Back up system files to the recovery drive.”
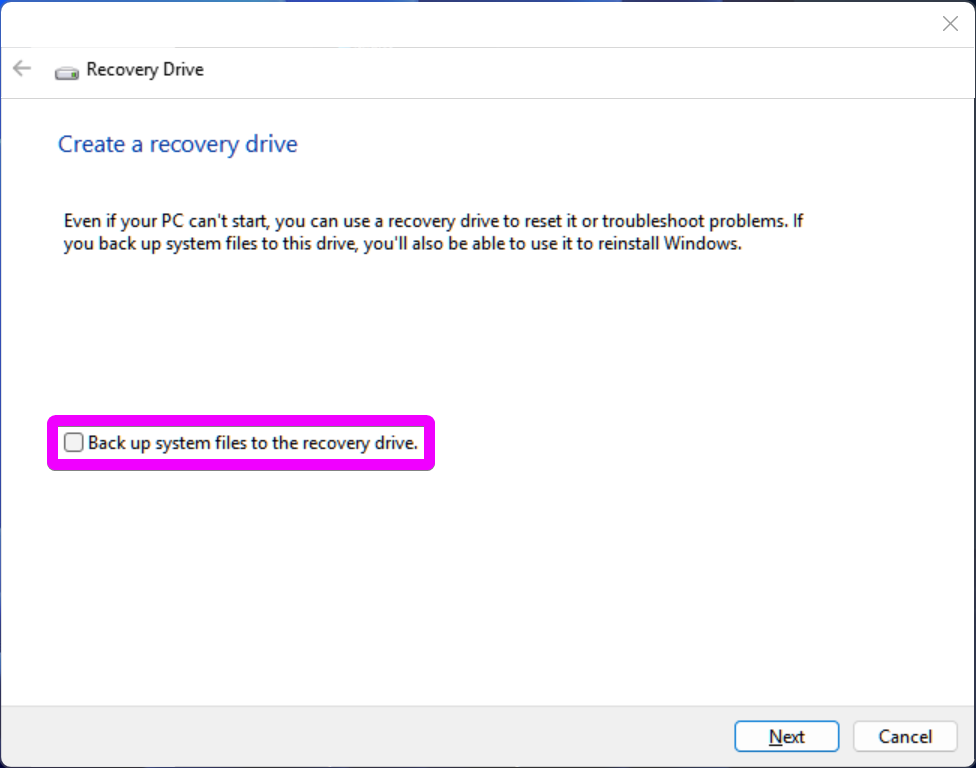
- Select your USB drive, then click Next, followed by Create. Once the process completes, click Finish.
- Once the Recovery Drive tool finishes, it will create a 32GB FAT32 partition on the USB drive labeled “RECOVERY”.
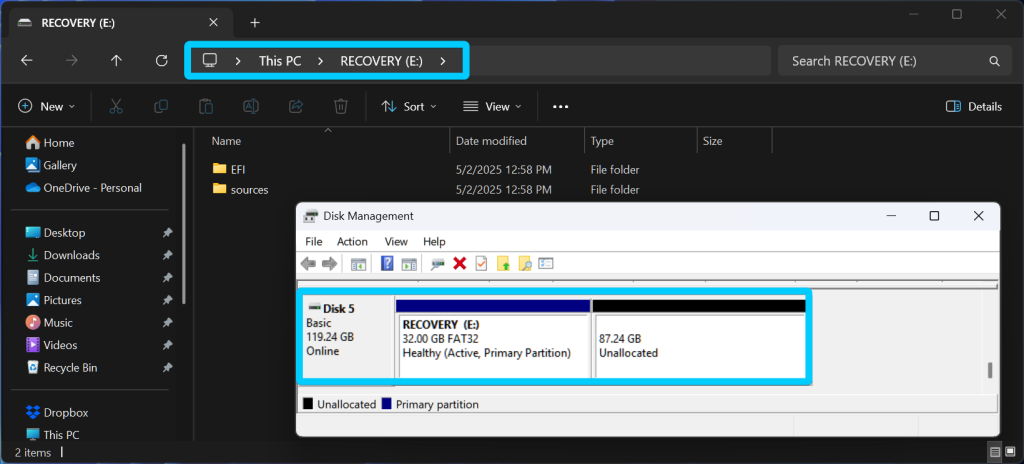
To manually create a bootable USB drive using the command line, follow the steps below. If your USB drive is larger than 32GB, it cannot be fully formatted as FAT32, so you will need to create a 32GB partition using the size=32000 command. If the drive is 32GB or smaller, you can skip this.
Steps to Format USB Drive with CMD
Open Command Prompt as Administrator and run the following:
diskpart
list disk
select disk <#>
clean
create partition primary size=32000
format fs=fat32 quick
assign
exit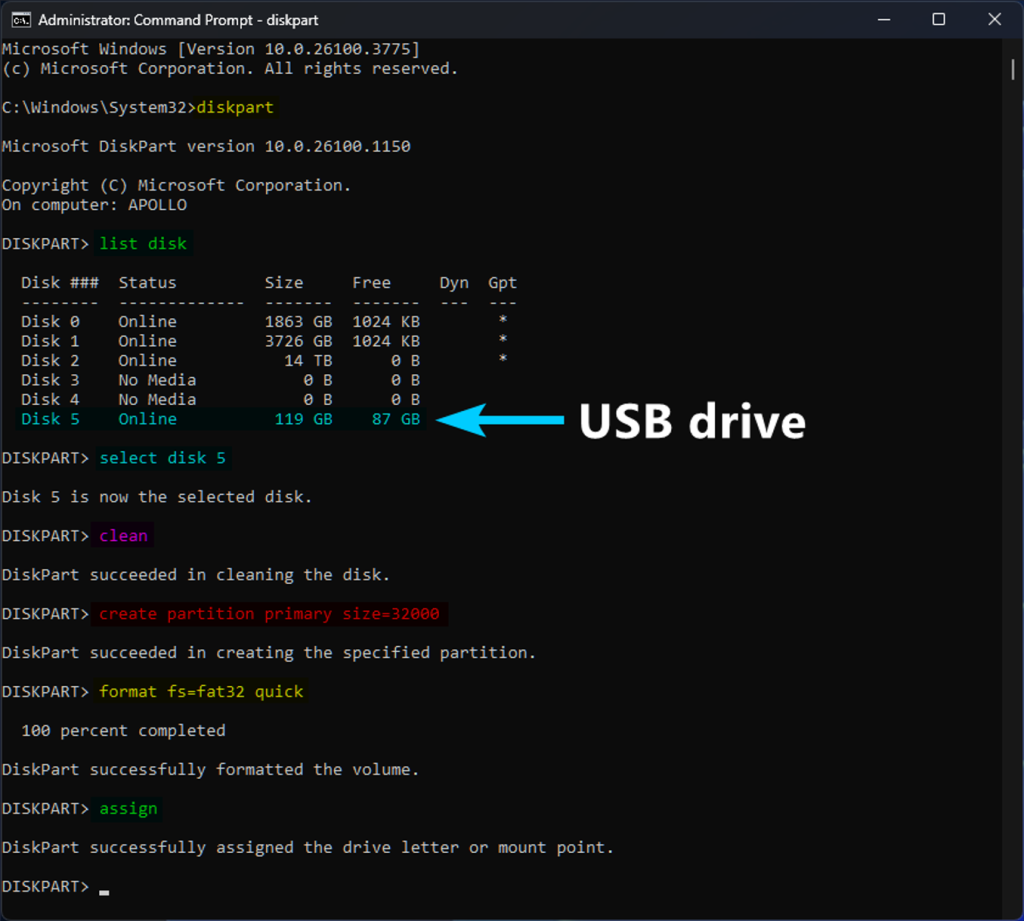
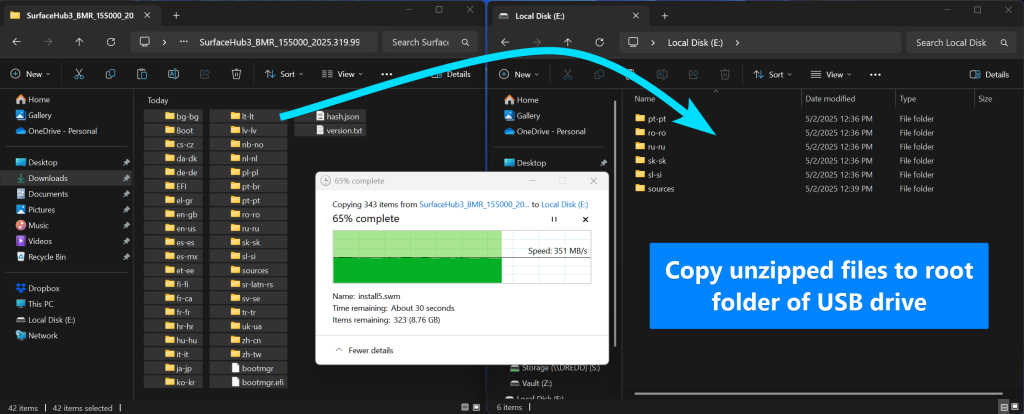
After preparing the USB drive using either the Recovery Drive tool or Diskpart, copy the contents of the recovery image (from Step 1) to the root of the USB drive.
If the recovery image is still in the compressed .zip format, extract it first. Make sure to copy the extracted files directly to the root of the USB drive (not into a subfolder) to ensure the device can detect the installation media during boot.
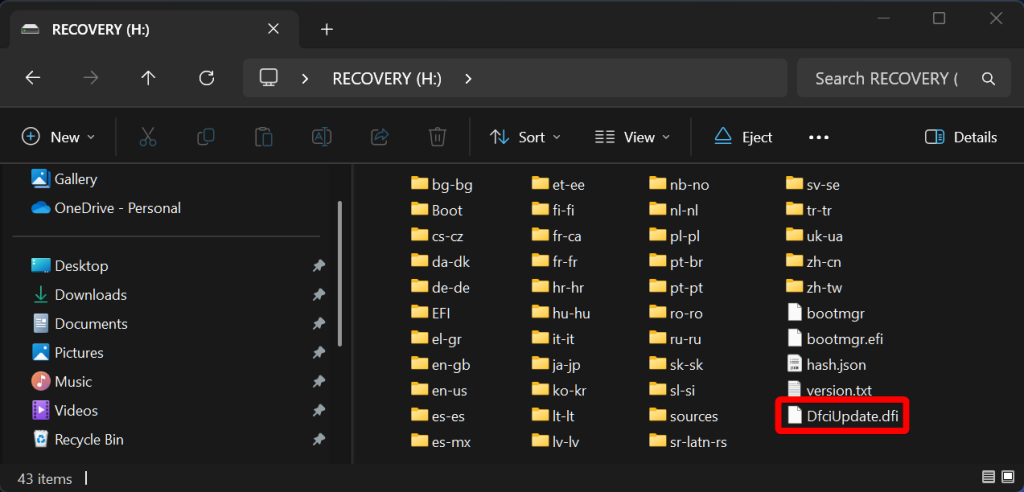
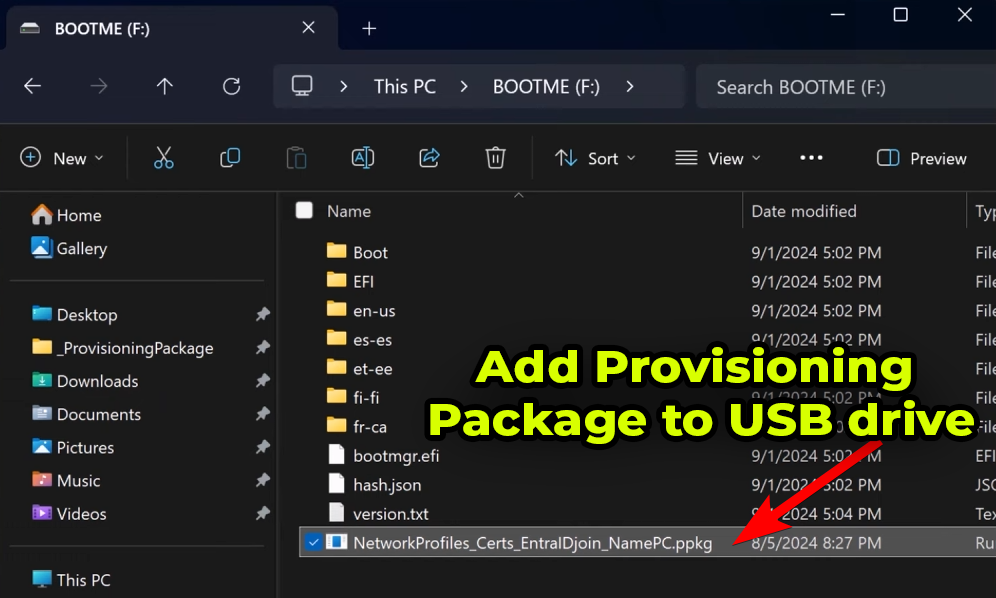
To streamline the migration process, you can use a single USB drive that includes both the MTR-W installation media and the SEMM package. After copying the MTR-W files to the drive, add the SEMM package (DfciUpdate.dfi, created in Section 2) to the root directory of the same USB drive.
The SEMM package is required to unlock UEFI on the Surface Hub 2S, which enables the device to boot from USB and install the MTR-W operating system.
Tip: Your combined USB drive should match the layout shown in the screenshot below.
Section 3: Verify Devices are Ready for MTR-W 🔗
Confirm Surface Hub 2S Meets Firmware Requirements
Before migrating a Surface Hub 2S to Microsoft Teams Rooms on Windows (MTR-W), the device must meet the minimum UEFI firmware version requirement. This firmware includes essential low-level updates that allow the MTR-W operating system to be installed on the device.
How to Verify
There are two ways to confirm Surface Hub 2S devices are meeting the minimum UEFI requirements. You can either:
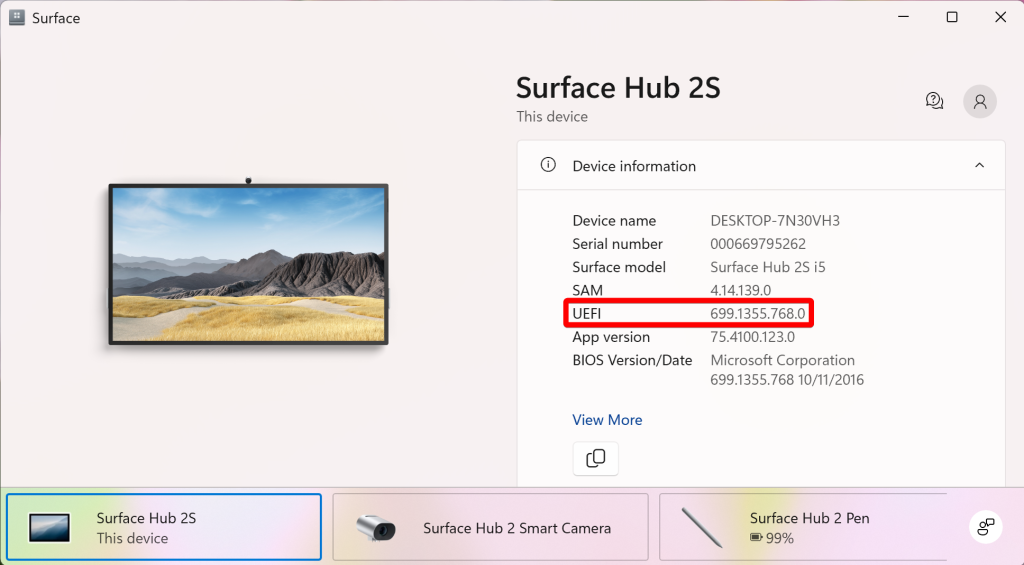
The Surface Hub 2S must have UEFI firmware version 699.845.768.0 or later to support migration to MTR-W. If the version is lower, run Windows Update to apply the latest updates before proceeding. You can check the firmware version either from the Surface app while the device is running Windows 10 Team edition, or directly within the UEFI settings menu during boot.
- With Surface Hub 2S booted into Windows 10 Team edition OS
- Go to Start > All apps > Surface > Your Surface
- Under Device information locate the UEFI version
- Confirm it is 699.845.768.0 or higher
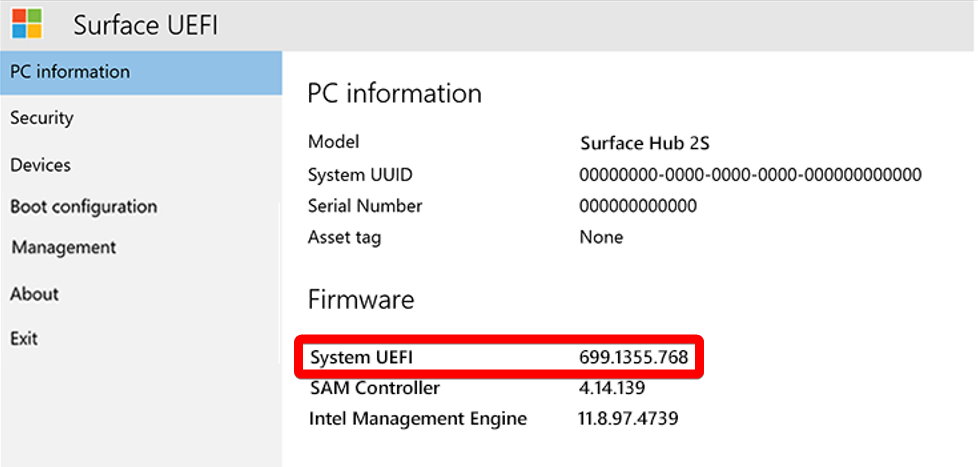
- Shut down the Surface Hub
- Hold Volume Up, then press Power

- Release Volume Up when the blue UEFI screen appears
- Under the PC information menu locate the System UEFI version
- Confirm its 699.845.768.0 or higher
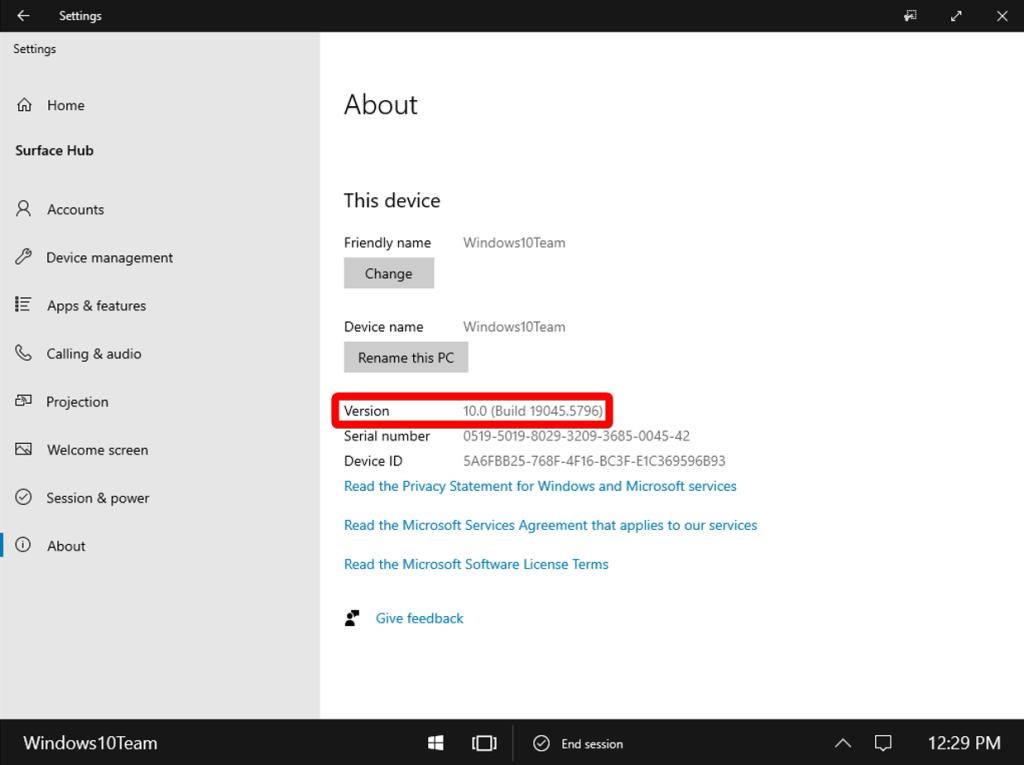
If you’re unable to check the UEFI version directly, you can verify whether the required firmware is already installed by checking the Windows 10 Team edition build number. A build of 19045.4123 or newer indicates the UEFI firmware update was applied as part of a previous cumulative Windows update.
- Go to Settings > Surface Hub > About
- Confirm the build number is 19045.4123 or higher
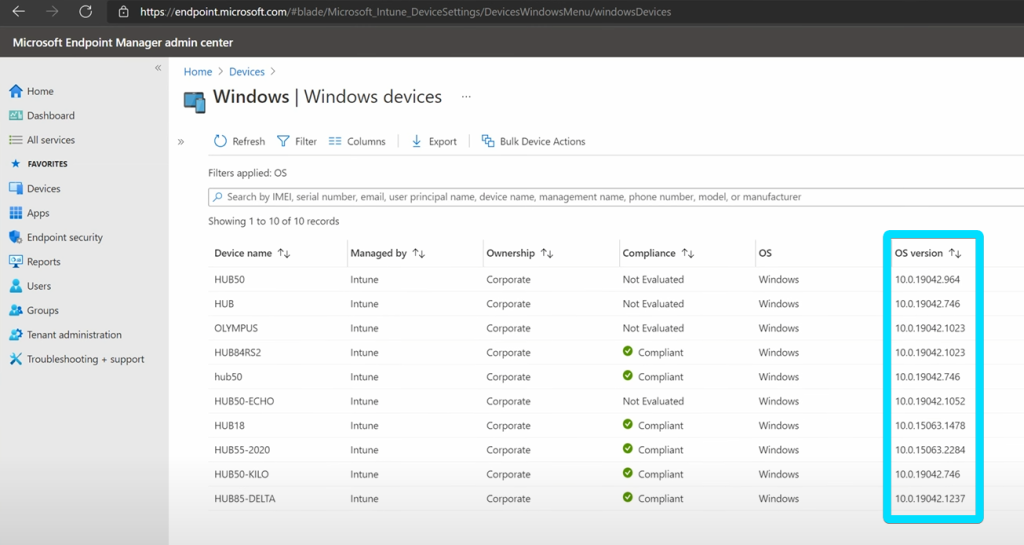
If the device is enrolled in Intune, you can view the OS version remotely from the Intune portal.
- In the Intune admin center navigate to Devices > All devices > Windows
- locate the enrolled Surface Hub 2S and check its OS version.
- Confirm the build number is 19045.4123 or higher
Tip: Follow this video walkthrough on how to check the OS version of a Surface Hub in Intune.
If either the UEFI firmware version or the Windows 10 Team edition build number do not meet the minimum required version, the Surface Hub 2S needs to be updated before proceeding with MTR-W OS migration.
Follow these steps to update the device:
- Confirm device has internet connectivity by opening the Edge browser
- Go to Settings > Update & Security > Windows Update
- Click Check for updates
- Allow all available updates to download and install
- Restart the device when prompted
- After restarting, repeat the version check to confirm the device now meets the minimum version requirement
If the device is not updating as expected, refer to the guidance in the article Troubleshoot a Surface Hub not updating.
Section 4: USB Migrate Surface Hub 2S to MTR-W 🔗
With your USB drive prepared and the Surface Hub 2S confirmed to meet the minimum UEFI firmware version, you are ready to begin the operating system migration to MTR-W. This section provides step-by-step guidance for unlocking UEFI, booting from USB, and installing Microsoft Teams Rooms on Windows (MTR-W) on the Surface Hub 2S.
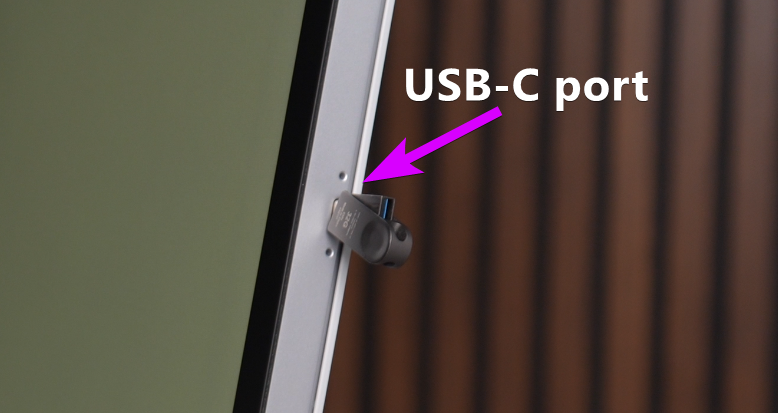
Begin by inserting the USB drive into the USB-A port located on the back of the Surface Hub 2S underneath the rear circular bump. The USB drive should include both of the following, copied to the root directory of the drive:
- SEMM package (DfciUpdate.dfi) – created in Section 1
- MTR-W USB installation media – created in Section 2
Note: If you’re using two separate USB drives, start with the one containing the SEMM package. The USB drive with the MTR-W installation media will be inserted later during Step 3.
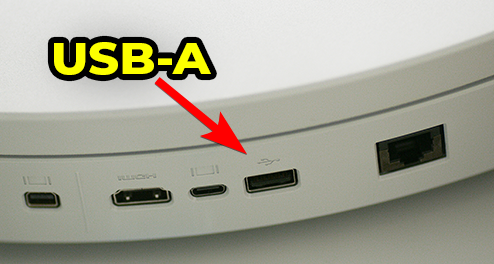
Alternatively, you can insert the USB drive into one of the USB-C ports located on the side, top, or bottom of the Surface Hub 2S.
To allow the MTR-W operating system to be installed, the Surface Hub 2S must be enrolled in Surface Enterprise Management Mode (SEMM). This process unlocks UEFI and enables OS migration. We created the SEMM package used to unlock the Surface Hub 2S in Section 1.
Follow the below steps:
1. Power off the device. Press and hold the Volume Up button, then press and release the power button. Continue holding Volume Up until the UEFI menu appears on the screen. If a UEFI password was previously set, enter it when prompted.

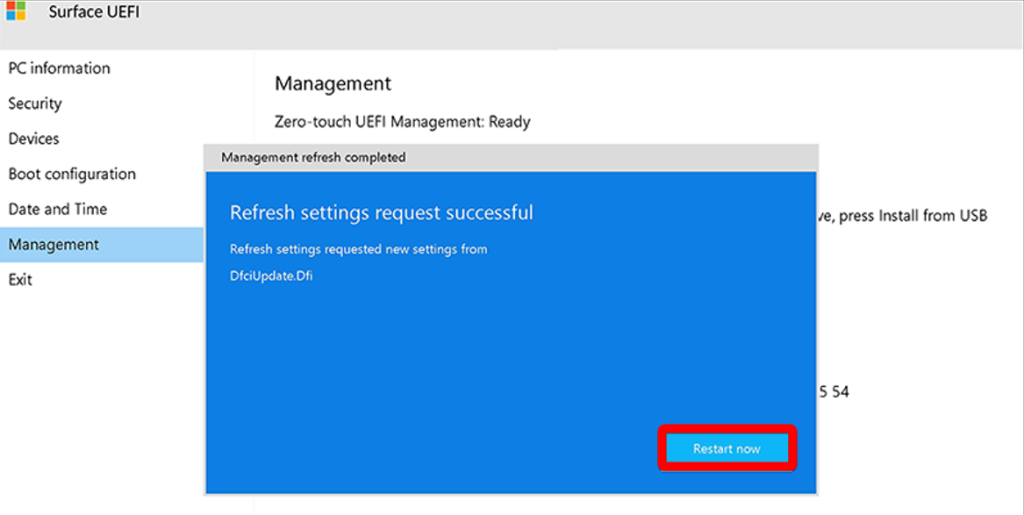
2. In the UEFI menu, go to Management > Install from USB and select the DfciUpdate.dfi file to apply the SEMM configuration.
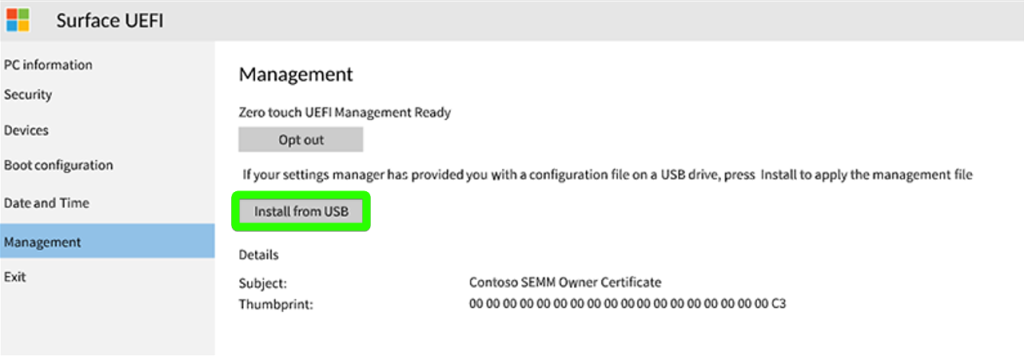
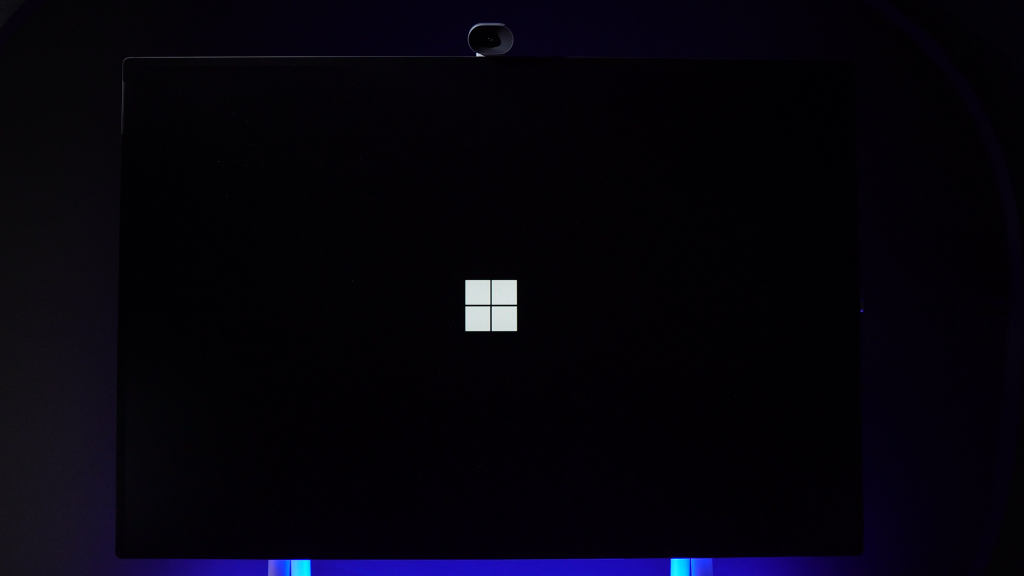
3. Once the SEMM package is installed, select Restart now from the UEFI menu.
The device will display a white Microsoft logo and then shut down automatically.
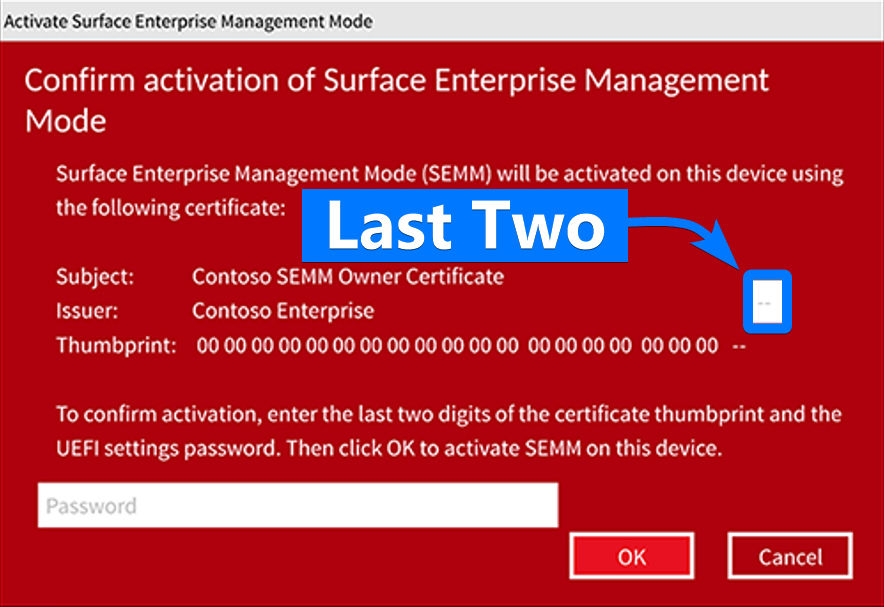
4. Turn the device back on by pressing the Power button. A red activation prompt will appear. Enter the last two characters of the certificate thumbprint and your UEFI password, then select OK to activate SEMM.
If you didn’t save the certificate thumbprint when creating the SEMM package you can extract it directly from the .pfx certificate file using PowerShell. To extract the thumbprint:
- Open PowerShell as Administrator
- Run the following command, replacing the file path and password as needed
- For this example, the last two characters are AE.
$pfx = Get-PfxCertificate -FilePath "C:\Path\To\YourCert.pfx"
$pfx.Thumbprint
5. The device will reboot once more, display the white Microsoft logo, and shut down again. This confirms that SEMM is active and the UEFI is now unlocked.
Insert USB drive containing MTR-W image
If not already done, insert the bootable USB drive we prepared in Section 2.
Boot Surface Hub 2S from USB drive
With the Surface Hub 2S powered off, press and hold the Volume Down button, then press the Power button once. Keep holding both buttons until the Windows logo with spinning dots appears, then release them.

Follow On-Screen Prompts in the Windows Recovery Environment
Once the recovery environment loads, follow the on-screen steps to install Microsoft Teams Rooms on Windows (MTR-W). The installation process typically takes between 30 to 90 minutes, depending on USB drive speed and device behavior.
Follow these steps:
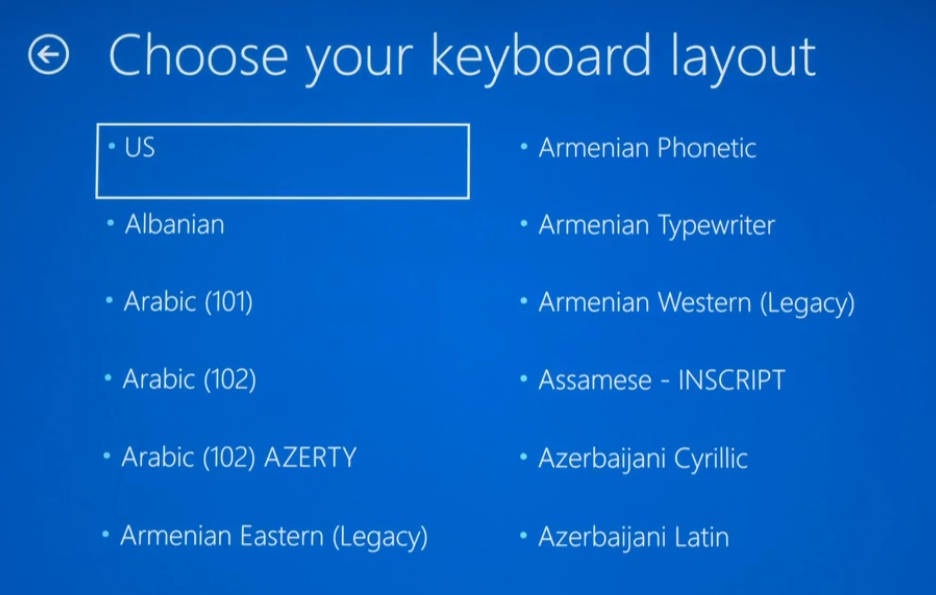
1. When the installation screen appears, choose a language.

2. Choose Keyboard Layout
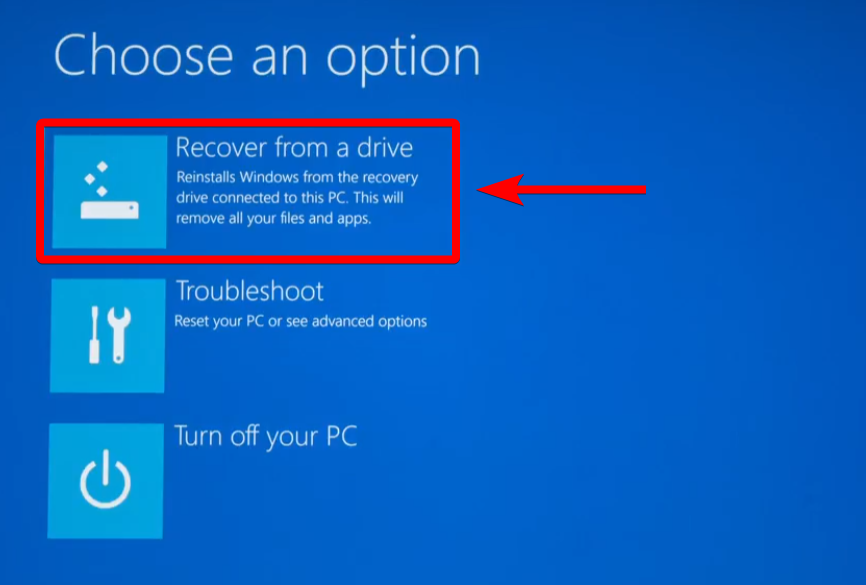
3. Choose Recover from a Drive
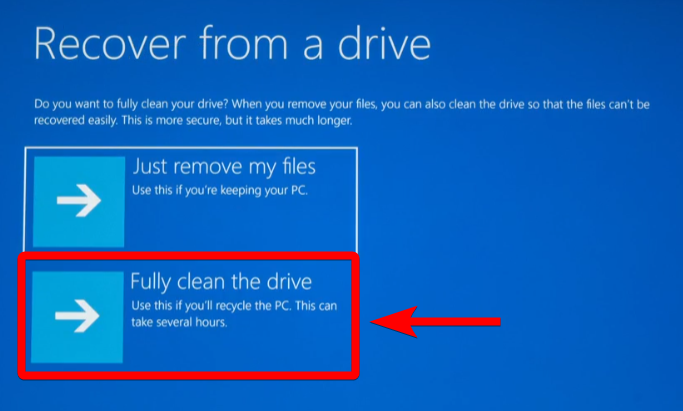
4. Select Fully clean the drive
5. Choose Recover
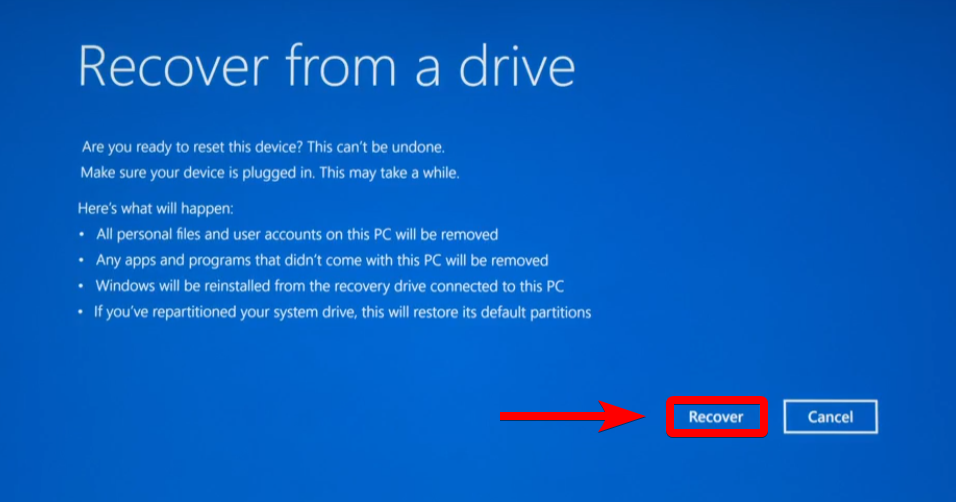
Note: If prompted for a BitLocker key, click Skip this drive in the bottom-right corner.
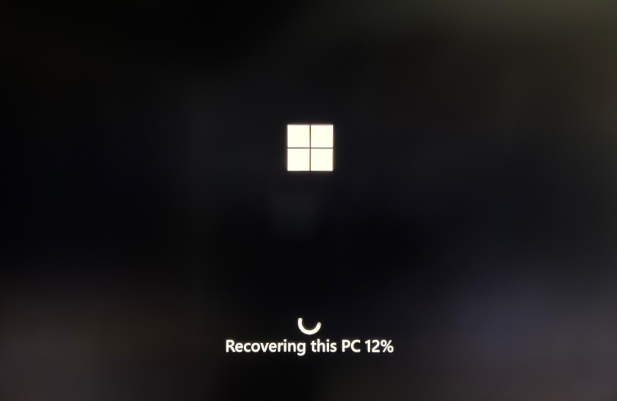
6. The Surface Hub will reboot several times during the recovery process, which may take up to 90 minutes.
7. When the Windows 11 IoT Enterprise out-of-box experience (OOBE) screen appears, remove the USB drive and complete initial setup.
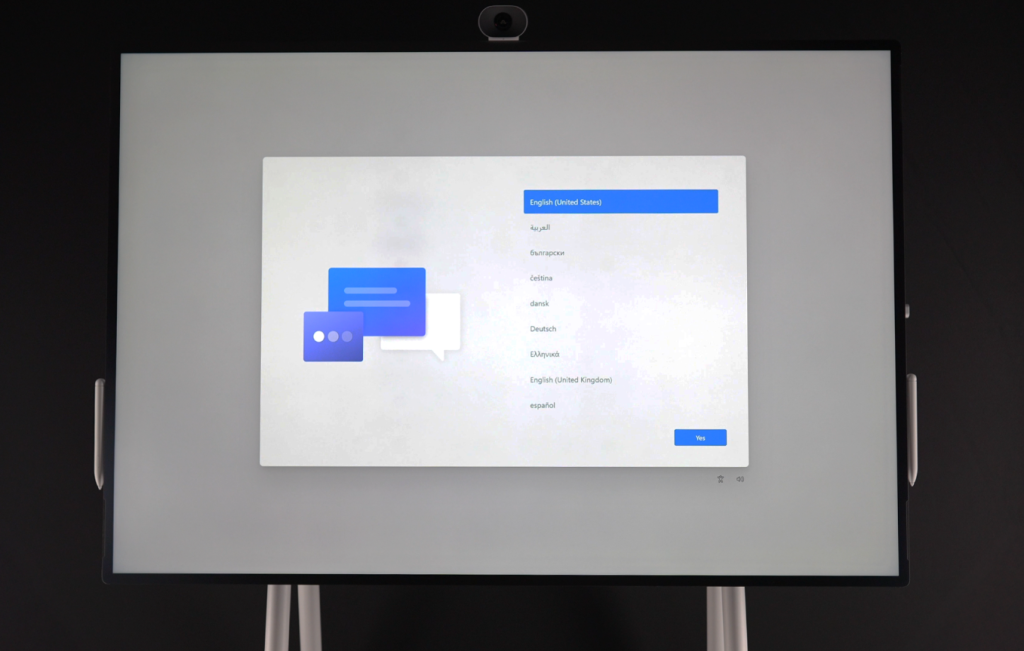
Section 5: Post-Migration Setup and Automation 🔗
Once the Surface Hub 2S has been migrated to Windows 11, it will land at the out-of-box experience (OOBE). At this stage, the device must be fully set up and reconfigured from scratch. This includes:
- Connecting to the network
- Installing Windows updates
- Joining the domain
- Enrolling into Intune/MDM
- and much more..
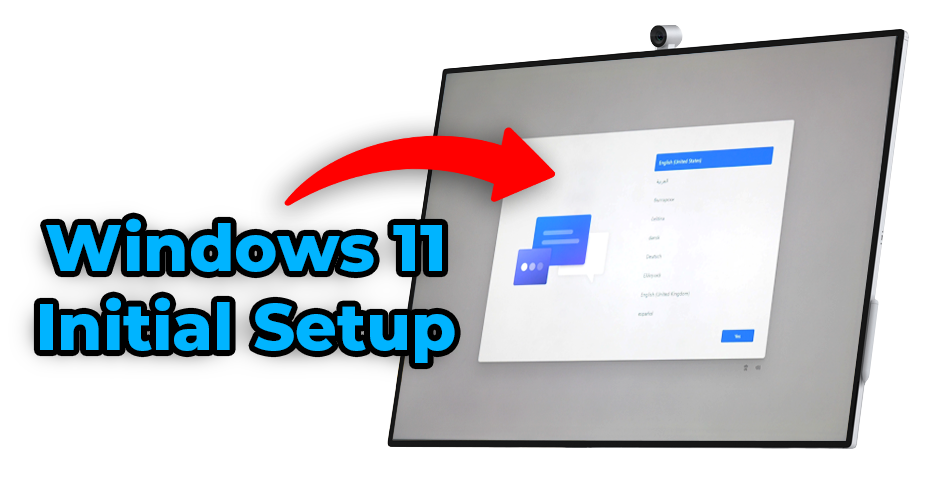
Automate Windows 11 Initial Setup
To help simplify and accelerate Windows 11 initial setup, you can leverage a Windows provisioning package to apply your custom settings and even fully automate Windows 11 initial setup, including the items mentioned above.
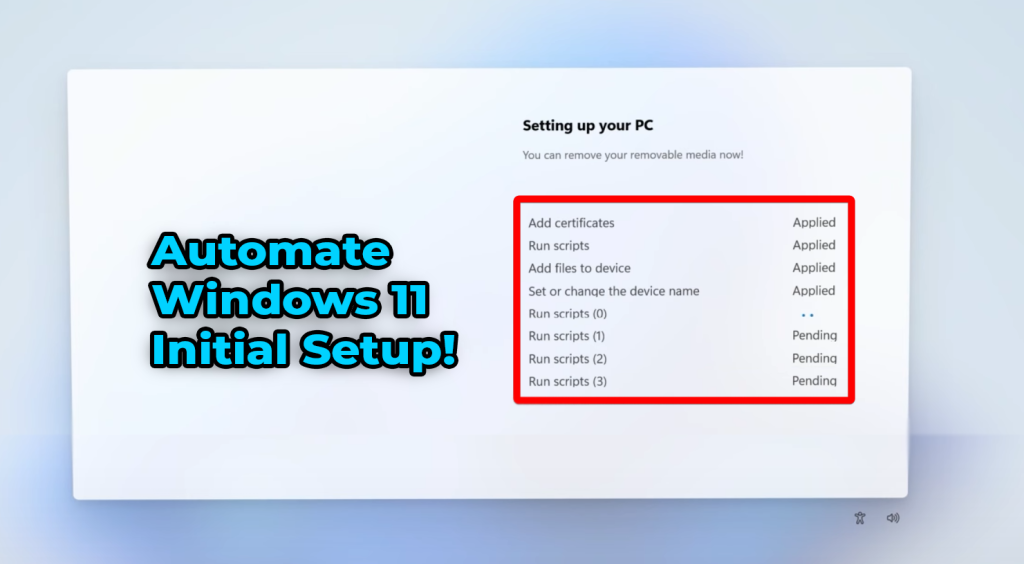
Provisioning packages (.ppkg) are configuration files that allow IT administrators to quickly apply custom settings, policies, network configuration settings, and much more, to Windows devices during initial setup using a USB drive.
These are fully supported by Microsoft as a method to streamline Windows 11 initial setup and can even be used to automate the entire process, as Windows 11 OOBE automatically installs them if they are detected on the inserted USB drive after Windows 11 installation completes.
To teach you everything you need to know about provisioning packages, and how to use them to automate and streamline Windows 11 initial setup I’ve created a three-part video series. For more information and resources make sure to checkout each video description on YouTube.
Video 1: Automate Windows 11 Setup
Covers the basics of USB provisioning packages, what they can configure in Windows 11, and how they can be used to streamline and automate the OOBE process.
Video 2: Create a Package to Automate Windows 11 Initial Setup
Walks through building a package from scratch, including both simple and advanced options such as wired and wireless 802.1x network authentication, certificates, Entra ID joining, and running PowerShell or CMDs.
Video 3: How to Test and Troubleshoot Packages
Explains how to validate and troubleshoot your provisioning packages before using them in a production environment.
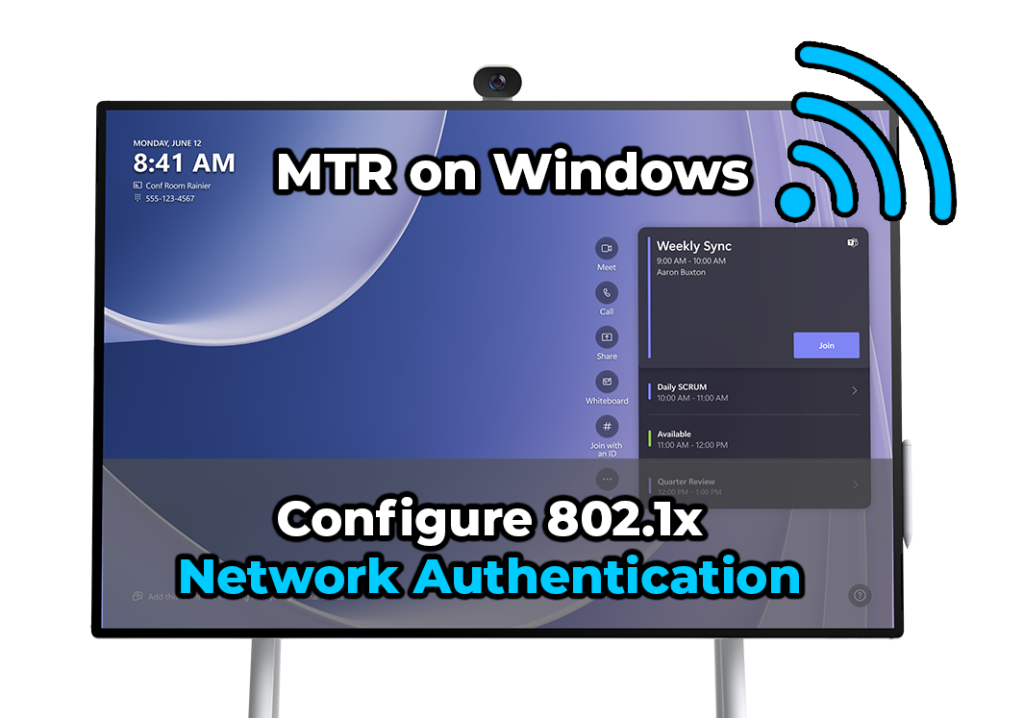
If your environment requires wired or wireless network access on an authenticated network, you may also want to review my guide on configuring 802.1X network authentication for Microsoft Teams Rooms on Windows devices. This applies to migrated Surface Hub 2S devices, Surface Hub 3, and any other MTR-W systems.
Conclusion
By following this guide, you’ve completed the full end-to-end process of migrating a Surface Hub 2S to Microsoft Teams Rooms on Windows (MTR-W) using a USB drive. From creating and applying the SEMM package to unlocking UEFI, to building the bootable installation media and performing the OS migration. Your device is now running the latest Microsoft Teams Rooms on Windows experience, fully equipped to function as a powerful all-in-one Teams conferencing device.